Create a Todo app
In this tutorial, we will be looking at how we can create a todo app using zango. This tutorial assumes you have already installed zango framework manually using our installation guide and set it up using our setup guide.
Spinning up the app
After we have sucessfully started the developement server, we will have to login into the zango platform and create an app named "todoapp" following the steps given in launching an app tutorial.
After this, if we look at the code, we will notice a new folder created under the workspace folder with name "todoapp". Consider this as similar to a django project in which we are going to write all the code related to our todoapp. Thats how Zango isolates the projects at code level.
Before moving on to code, make sure you have configured a domain for your app.
Lets write some code!
After the app has been launched, your code structure will look something like:
root                        # root where this readme file is located.
|
+-- ZangoProject          # main ZangoProject folder which contains everything related to our project.
|   |
|   +-- workspaces          # all the apps are create dynamically inside this folder.
    |   |
    |   +-- todoapp        # todo app directory, detailed app structure is present inside the app directory.
        |   |
        |   +-- Readme.md   # app readme, contains app structure and other app specific details.
            .
            .
    +-- ZangoProject      # contains all the zango platform configuration files.
    |   |
    |   +-- asgi.py
        +-- settings.py     # contains all the project settings, just like django.
        +-- urls_public.py  # contains config for urls of zango platform.
        +-- urls_tenants.py # contains config for urls of apps present inside project.
        +-- urls.py
        +-- wsgi.py
    +-- manage.py           # same manage.py which is there in traditional django projects.
+-- Readme.md               # The file which we are reading right now.
+-- .gitignore
+-- .env                    # This is required for running the project.
+-- venv
1. Creating todo module
First of all we will create a module inside our todoapp and name it "todo". Modules are like django apps which helps to improve organization, maintainability and understanding of the code. The models, forms, tables, views, urls etc are created inside modules. You can read more about modules here. After creating the todo module, your workspace folder will look something like:
root                                # root where this readme file is located.
|
+-- ZangoProject                    # main ZangoProject folder which contains everything related to our project.
|   |
|   +-- workspaces                  # all the apps are create dynamically inside this folder.
    |   |
    |   +-- todoapp                 # todo app directory, detailed app structure is present inside the app directory.
        |   |
        |   +-- todo                # newly created todo module
            |   |
            |   +-- models.py       # contains the models related to todo module
                |
                +-- views.py        # contains the views related to todo module
                |
                +-- urls.py         # contains the urls related to todo module
2. Registering the todo module
After we have created your module we have register that module inside settings.json. You can read more about registering a module here. After your module is regsitered, your settings.json will look something like:
MyFirstProject/workspaces/todoapp/settings.json
{
    "version": "1.0.0",
    "modules": [
        {
            "name": "todo",
            "path": "todo"
        }
    ],
    "app_routes": [
        {
            "re_path": "^todo/",
            "module": "todo",
            "url": "urls"
        }
    ],
    "package_routes": []
}
3. Installing the required Zango packages
One of the powerful component of Zango is it package ecosystem. Zango Packages are reusable components that add functionality
to your Zango applications. Like Python packages, they offer a convenient way to modularize and share components across
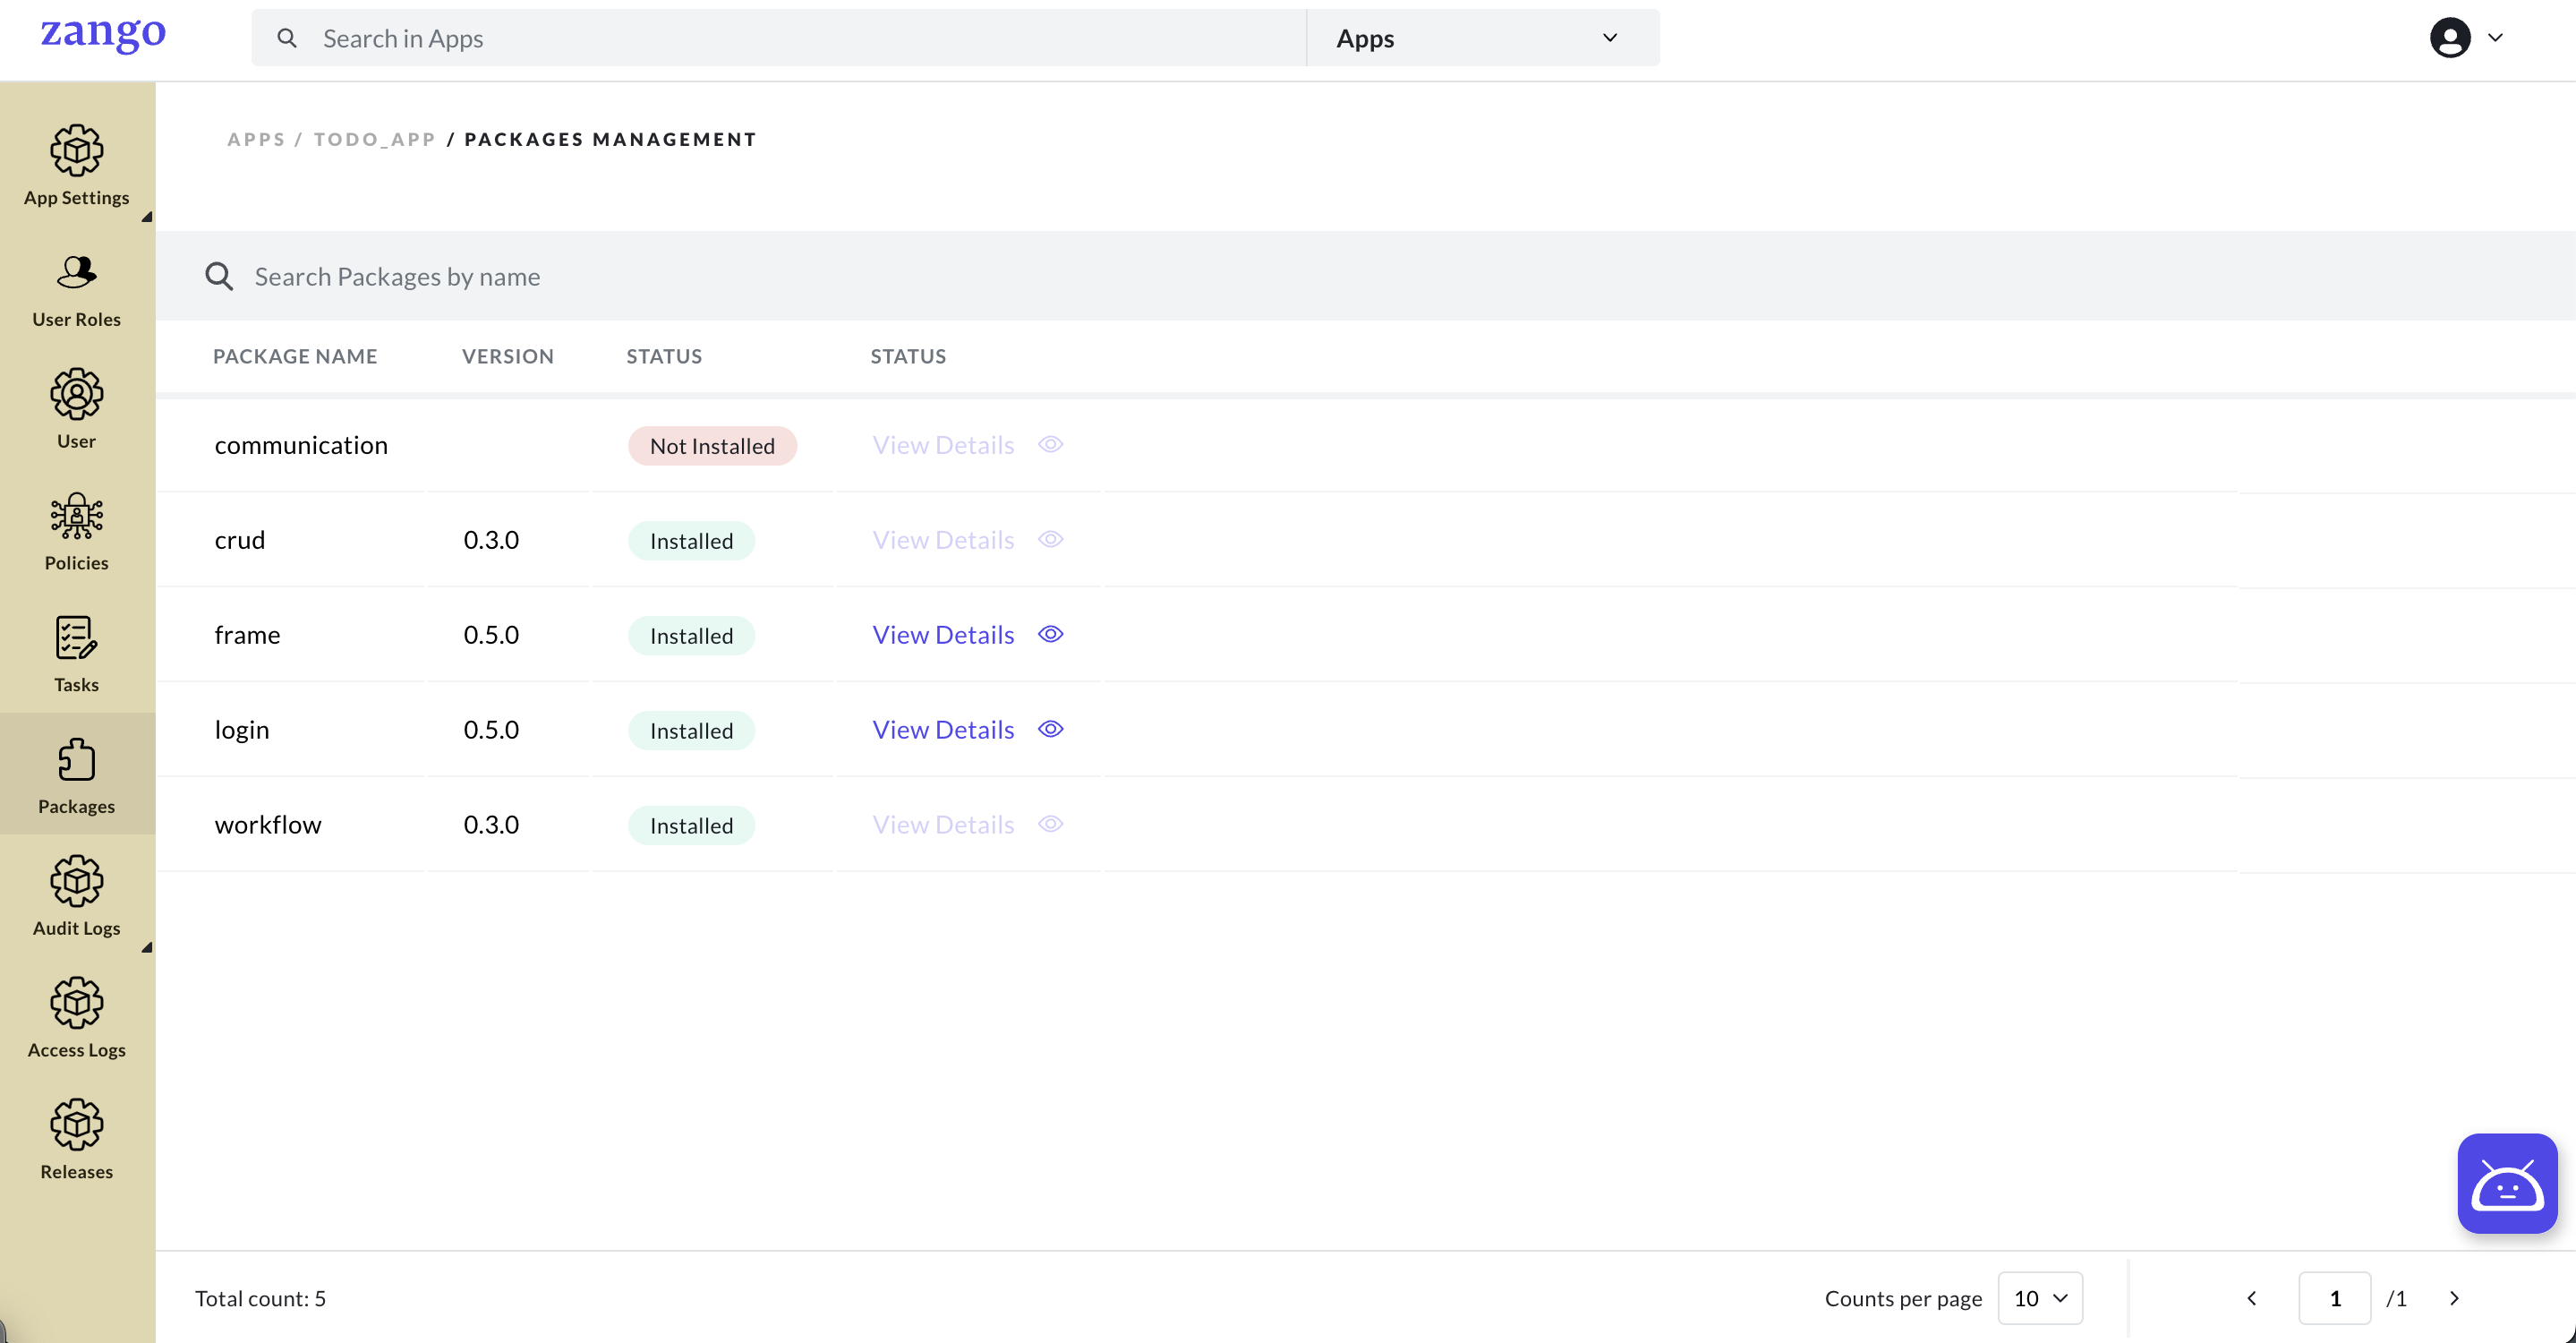
various applications on the Zango platform. The packages required for our todo app are crud,
frame, login and workflow.
We can install a package by simply clicking on three dots which appears on the the right side when we hover on the package
and then clicking on the install package button.
3. Creating the model
We will be creating a note model to store all the todo items in the database. You can read about models here.
MyFirstProject/workspaces/todoapp/todo/models.py
from zango.apps.dynamic_models.models import DynamicModelBase
from django.db import models


class Note(DynamicModelBase):
    COMPLETED = "completed"
    IN_PROGRESS = "in_progress"
    ON_HOLD = "on_hold"
    CANCELED = "canceled"

    NOTE_STATUS_CHOICES = [
        (COMPLETED, "Completed"),
        (IN_PROGRESS, "In progress"),
        (ON_HOLD, "On hold"),
        (CANCELED, "Canceled")
    ]

    title = models.CharField(max_length=100)
    description = models.TextField(null=True, blank=True)
    status = models.CharField(max_length=20, choices=NOTE_STATUS_CHOICES, default=IN_PROGRESS)

    def __str__(self):
        return self.title
4. Creating the forms
Next we are going to need a form for creating new todo items.
MyFirstProject/workspaces/todoapp/todo/forms.py
from ..packages.crud.forms import BaseForm
from ..packages.crud.form_fields import ModelField

from .models import Note

class NoteForm(BaseForm):
    title = ModelField(placeholder="Enter Title ", required=True, required_msg="This field is required.")
    description = ModelField(placeholder="Enter description", required=True, required_msg="This field is required.")

    class Meta:
        title = "Notes"
        model = Note
5. Creating the table
Tables visually display structured data in a clear, organized format within applications. Customizing tables enhances data presentation for user-friendly interaction. By organizing information into rows and columns, tables make data easy to understand and navigate. This layout helps users quickly grasp essential details. You can read more about tables here.
We are going create a TodoTable which will display all the objects of our note model in a structured way. The table will
look something like:
MyFirstProject/workspaces/todoapp/todo/tables.py
from ..packages.crud.table.base import ModelTable
from ..packages.crud.table.column import ModelCol

from .models import Note
from .forms import NoteForm

class TodoTable(ModelTable):
    id = ModelCol(display_as='ID', sortable=True, searchable=True)
    title = ModelCol(display_as='Title', sortable=True, searchable=True)
    description = ModelCol(display_as='Description', sortable=True, searchable=True)
    status = ModelCol(display_as='Status', sortable=True)

    table_actions = []
    row_actions = [
        {
            "name": "Edit",
            "key": "edit",
            "description": "Edit Note",
            "type": "form",
            "form": NoteForm,
        },
    ]

    class Meta:
        model = Note
        fields = ['id', 'title', 'description', 'status']
        row_selector = {'enabled': False, 'multi': False}
6. Defining the Workflow
The Workflow component, offered by the Workflow Package, is an essential tool for managing and structuring data model lifecycles. It allows developers to define statuses, create transitions, and trigger actions, making it easier to enforce business rules and maintain a transparent workflow.
In this todo app, we will create a workflow for changing the status of the list item. The TodoWorkflow class will look
something like this:
MyFirstProject/workspaces/todoapp/todo/workflow.py
from ..packages.workflow.base.engine import WorkflowBase

from .models import Note


class TodoWorkflow(WorkflowBase):
    status_transitions = [
        {
            "name": "progress_to_completed",
            "display_name": "Mark as completed",
            "description": "Mark this todo item as completed.",
            "from": "in_progress",
            "to": "completed",
            "confirmation_message": "Are you sure you want to mark this todo item as completed?",
        },
        {
            "name": "progress_to_hold",
            "from": "in_progress",
            "to": "on_hold",
            "display_name": "Put on hold",
            "description": "Put this todo item on hold.",
            "confirmation_message": "Are you sure you want to put this todo item on hold?",
        },
        {
            "name": "hold_to_progress",
            "from": "on_hold",
            "to": "in_progress",
            "display_name": "Mark as in progress",
            "description": "Mark this todo item as in progress.",
            "confirmation_message": "Are you sure you want to mark this todo item as in progress?",
        },
        {
            "name": "progress_to_canceled",
            "from": "in_progress",
            "to": "canceled",
            "display_name": "Mark as canceled",
            "description": "Mark this todo item as canceled.",
            "confirmation_message": "Are you sure you want to mark this todo item as canceled?",
        },
        {
            "name": "hold_to_canceled",
            "from": "on_hold",
            "to": "canceled",
            "display_name": "Mark as canceled",
            "description": "Mark this todo item as canceled.",
            "confirmation_message": "Are you sure you want to mark this todo item as canceled?",
        },
    ]


    def progress_to_completed_done(self, request, object_instance, transaction_obj):
        object_instance.status = Note.COMPLETED
        object_instance.save()


    def progress_to_hold_done(self, request, object_instance, transaction_obj):
        object_instance.status = Note.ON_HOLD
        object_instance.save()

    def hold_to_progress_done(self, request, object_instance, transaction_obj):
        object_instance.status = Note.IN_PROGRESS
        object_instance.save()

    def progress_to_cancelled_done(self, request, object_instance, transaction_obj):
        object_instance.status = Note.CANCELED
        object_instance.save()

    def hold_to_cancelled_done(self, request, object_instance, transaction_obj):
        object_instance.status = Note.CANCELED
        object_instance.save()


    class Meta:
        statuses = {
            "in_progress": {
                "color": "#00857C",
                "label": "In Progress",
            },
            "completed": {
                "color": "#00FF00",
                "label": "Completed",
            },
            "on_hold": {
                "color": "#FFDB58",
                "label": "On hold",
            },
            "canceled": {
                "color": "#FF0000",
                "label": "Canceled",
            },
        }
        model = Note
        on_create_status = "in_progress"
7. Creating the view
We will combine all the parts that we created in the previous steps and serve them through the powerful BaseCrudView
of the Crud Package. We have to simply tell BaseCrudView about the Format to display the data in,
i.e the table, the form to add new records to that table and the workflow to be used to modify the records, And it automatically
creates all the functionality by itself. Our TodoCrudView will look something like this:
MyFirstProject/workspaces/todoapp/todo/views.py
from ..packages.crud.base import BaseCrudView
from .tables import TodoTable
from .forms import NoteForm
from .workflow import TodoWorkflow

class TodoCrudView(BaseCrudView):
    page_title = "Todo list"
    add_btn_title = "New todo item"
    table = TodoTable
    form = NoteForm
    workflow = TodoWorkflow

    def display_add_button_check(self, request):
        return True
8. Attaching view to an url
We have to now attach our TodoCrudView to an endpoint. Its quite simple and straightforward. Our urls.py will look something
like:
MyFirstProject/workspaces/todoapp/todo/urls.py
from django.urls import path
from .views import TodoCrudView

urlpatterns = [
    path('all/', TodoCrudView.as_view(), name='todo_crud'),
]
9. Definig policy
The last step is to define a policy for our view. It is one of the most crucial component of Zango's permission framework.
Policies help us to provide a flexible access control over the views and permissions. You can read more about policies
here.
To define policies for our todo app, we will create a policies.json file inside the todo module. Our policies.json for todoapp will look something like:
MyFirstProject/workspaces/todoapp/todo/policies.json
{
    "policies": [
          {
                "name": "TodoCrudViewAccess",
                "description": "Access to the Todo CRUD View",
                "statement": {
                   "permissions": [
                      {
                            "name": "todo.views.TodoCrudView",
                            "type": "view"
                      }
                   ]
                }
          }
    ]
}
And with this we have completed the coding part. Or we can say, At code level, Our TODO app is ready!
Creating and applying the migrations
Now make migrations for our todo app and app it on our database. For generating migrations use the below command:
python manage.py ws_makemigration todoappTo apply the generated migrations to our database, simply run:
python manage.py ws_migrate todoapp
Configuring domain, user roles, user, and frames
Policies
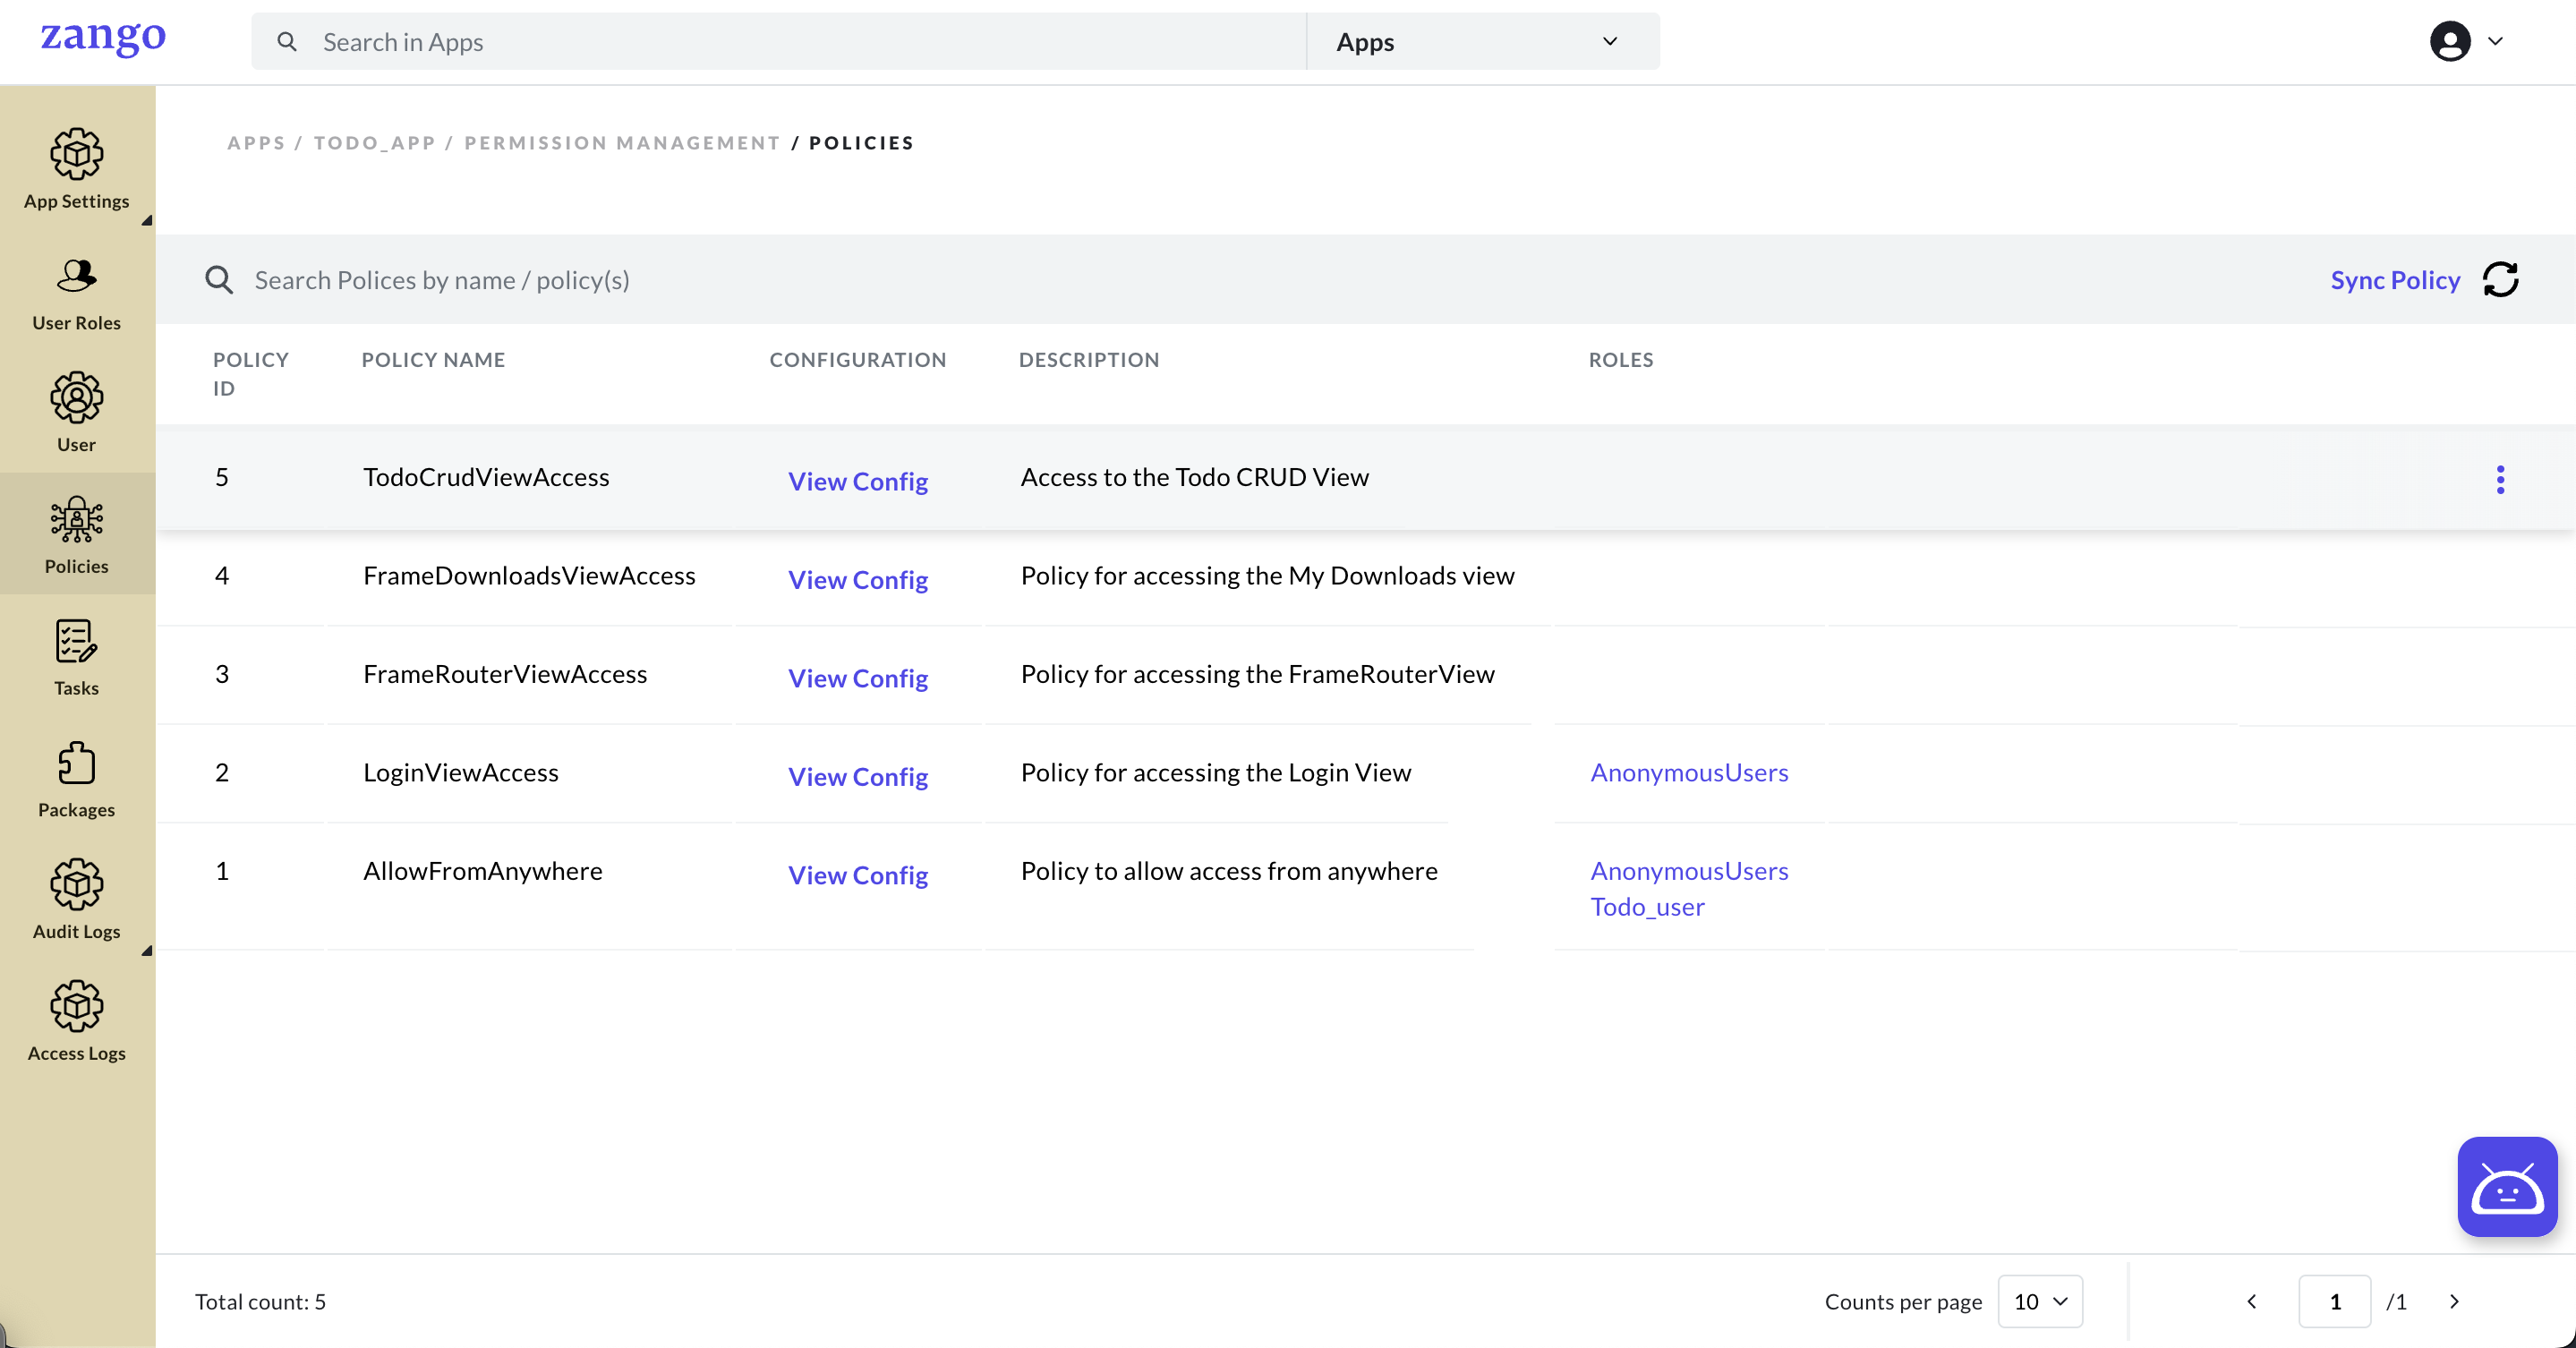
Remember the TodoCrudViewAccess policy we created in previous steps which allowed us to perform crud operations through TodoCrudView?
we will now go to policies and using that sync policy button at the top right, we will sync the policies from the code to our database
so that we can configure it via dashboard. Once our policy is synced, it will look something like:
User roles
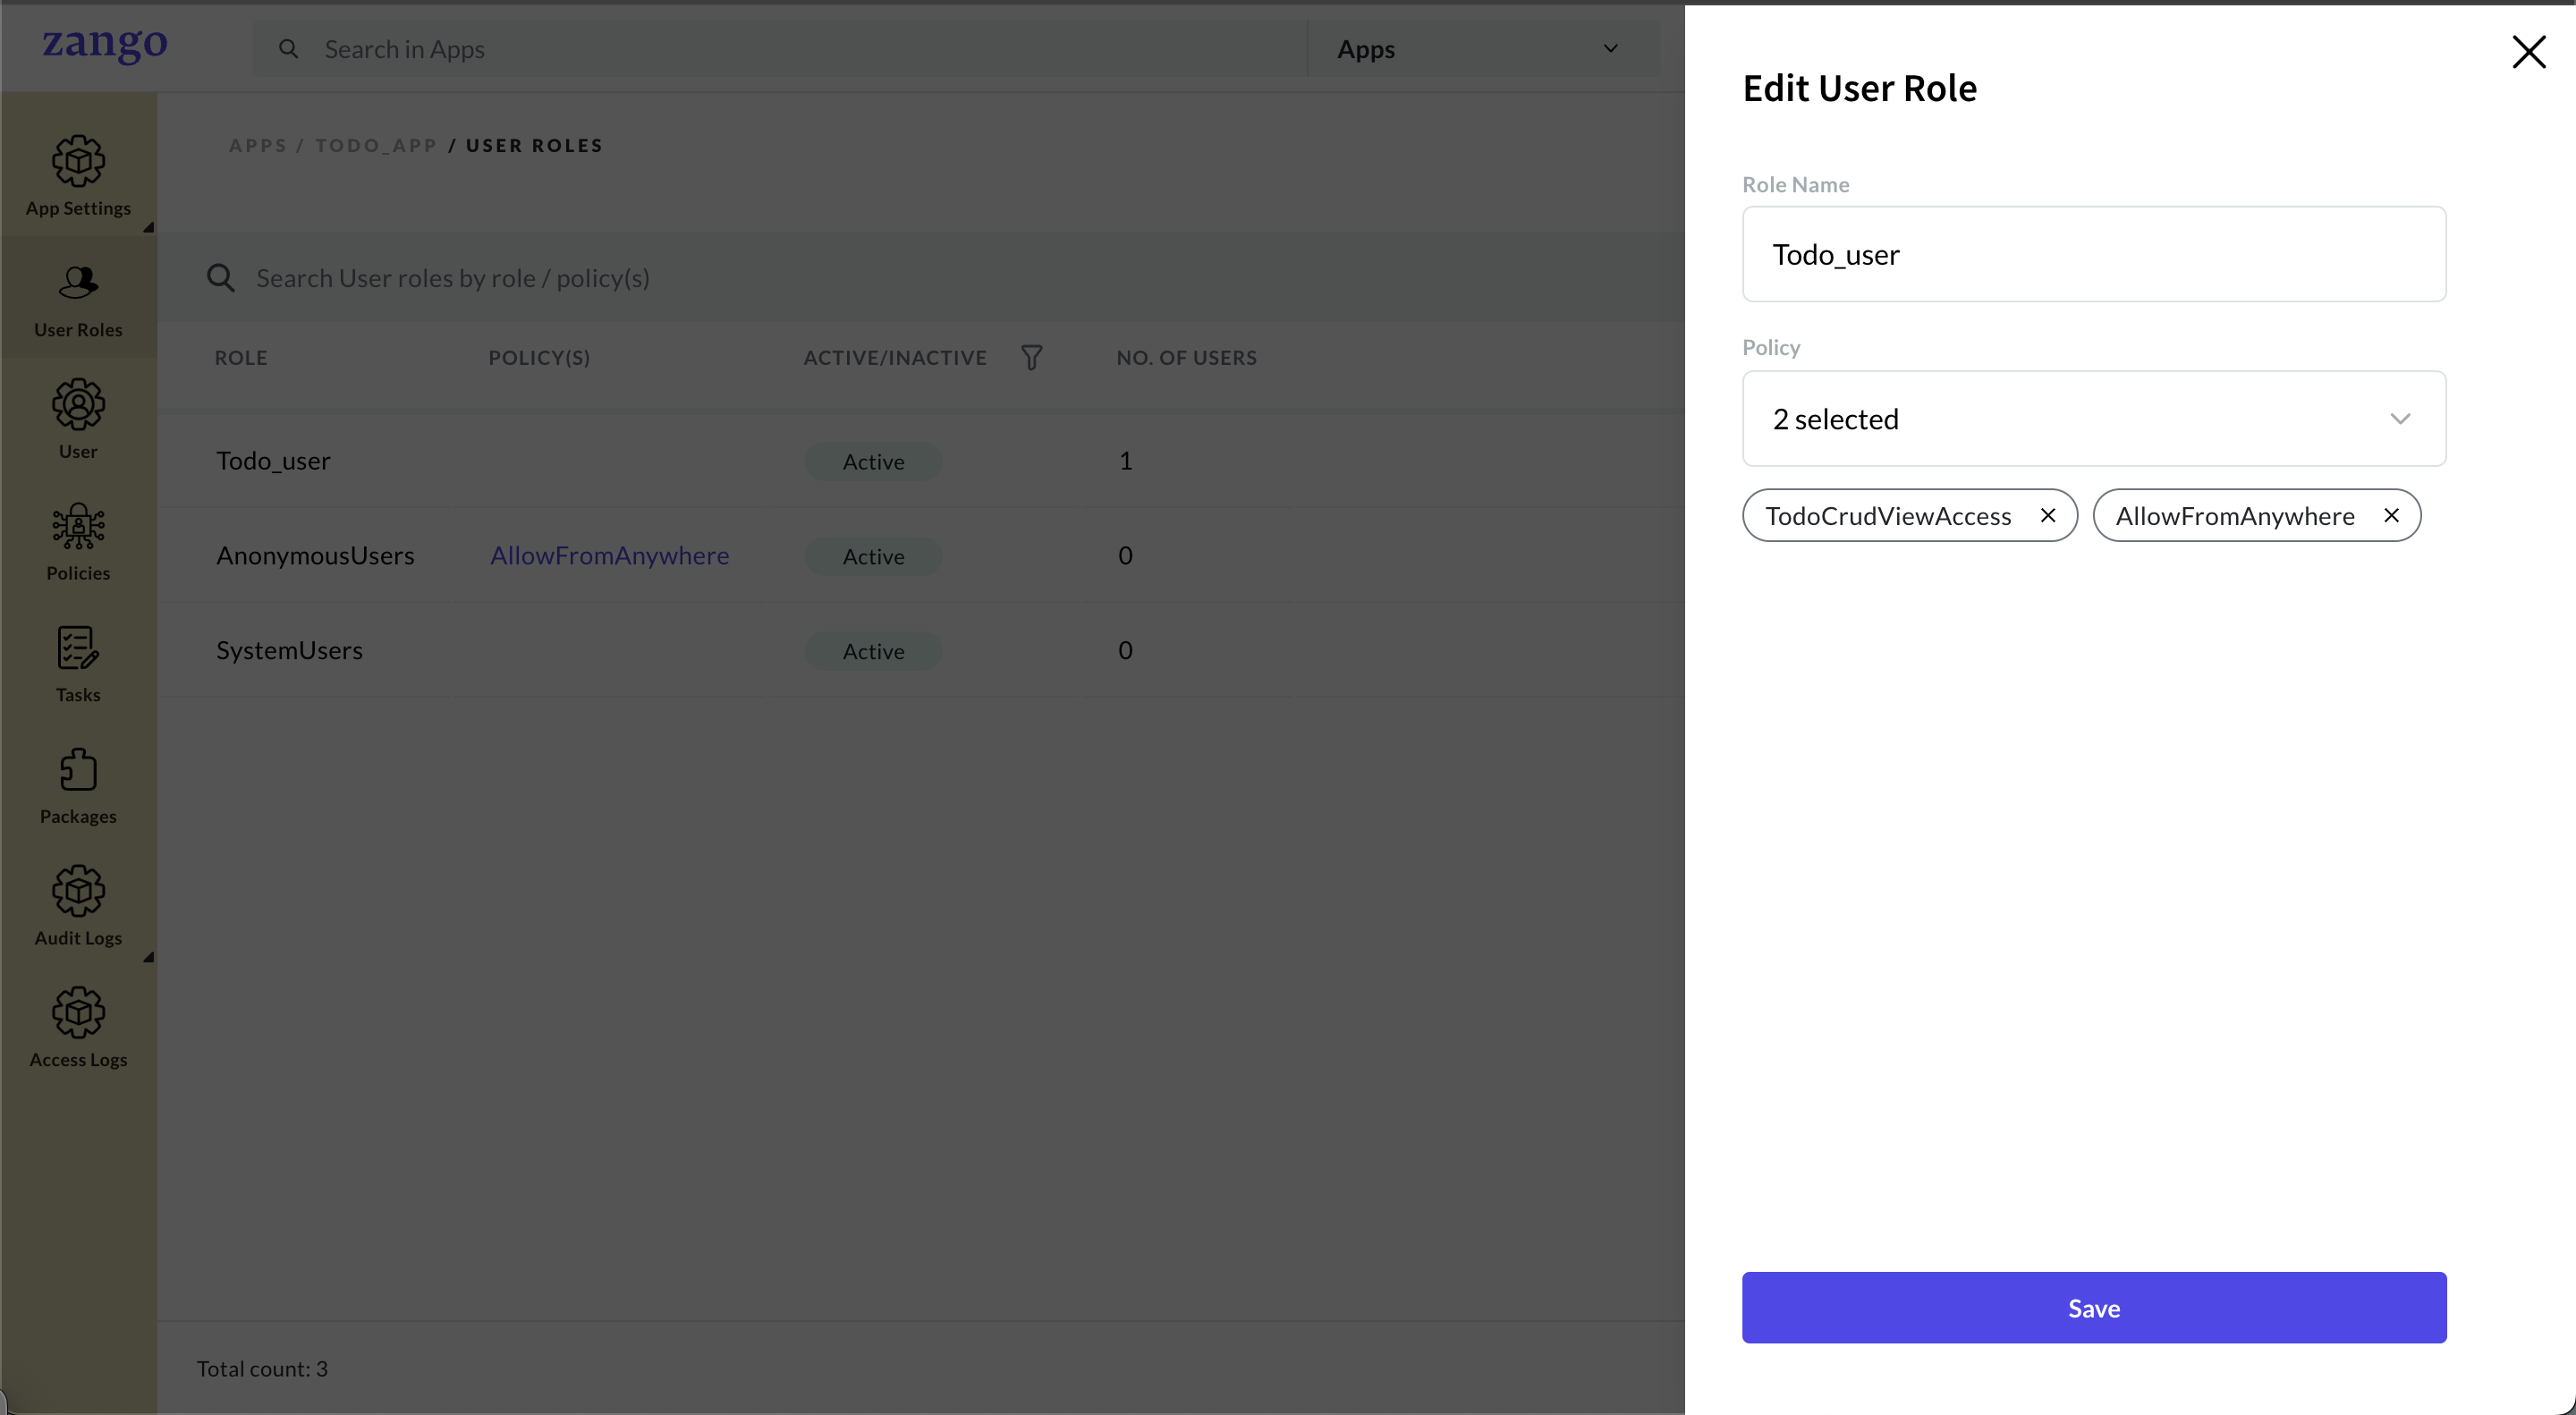
We can create multiple user roles and assign multiple policies to them. These roles can be further assigned to users as per requirements. You can read more about user roles here.
In our todo app, we will create a user role called Todo_user and assign TodoCrudViewAccess and AllowFromAnywhere
policy to it. AllowFromAnywhere is a default policy provided by zango to allow user (with that particular role and policy)
access the project from any IP address.
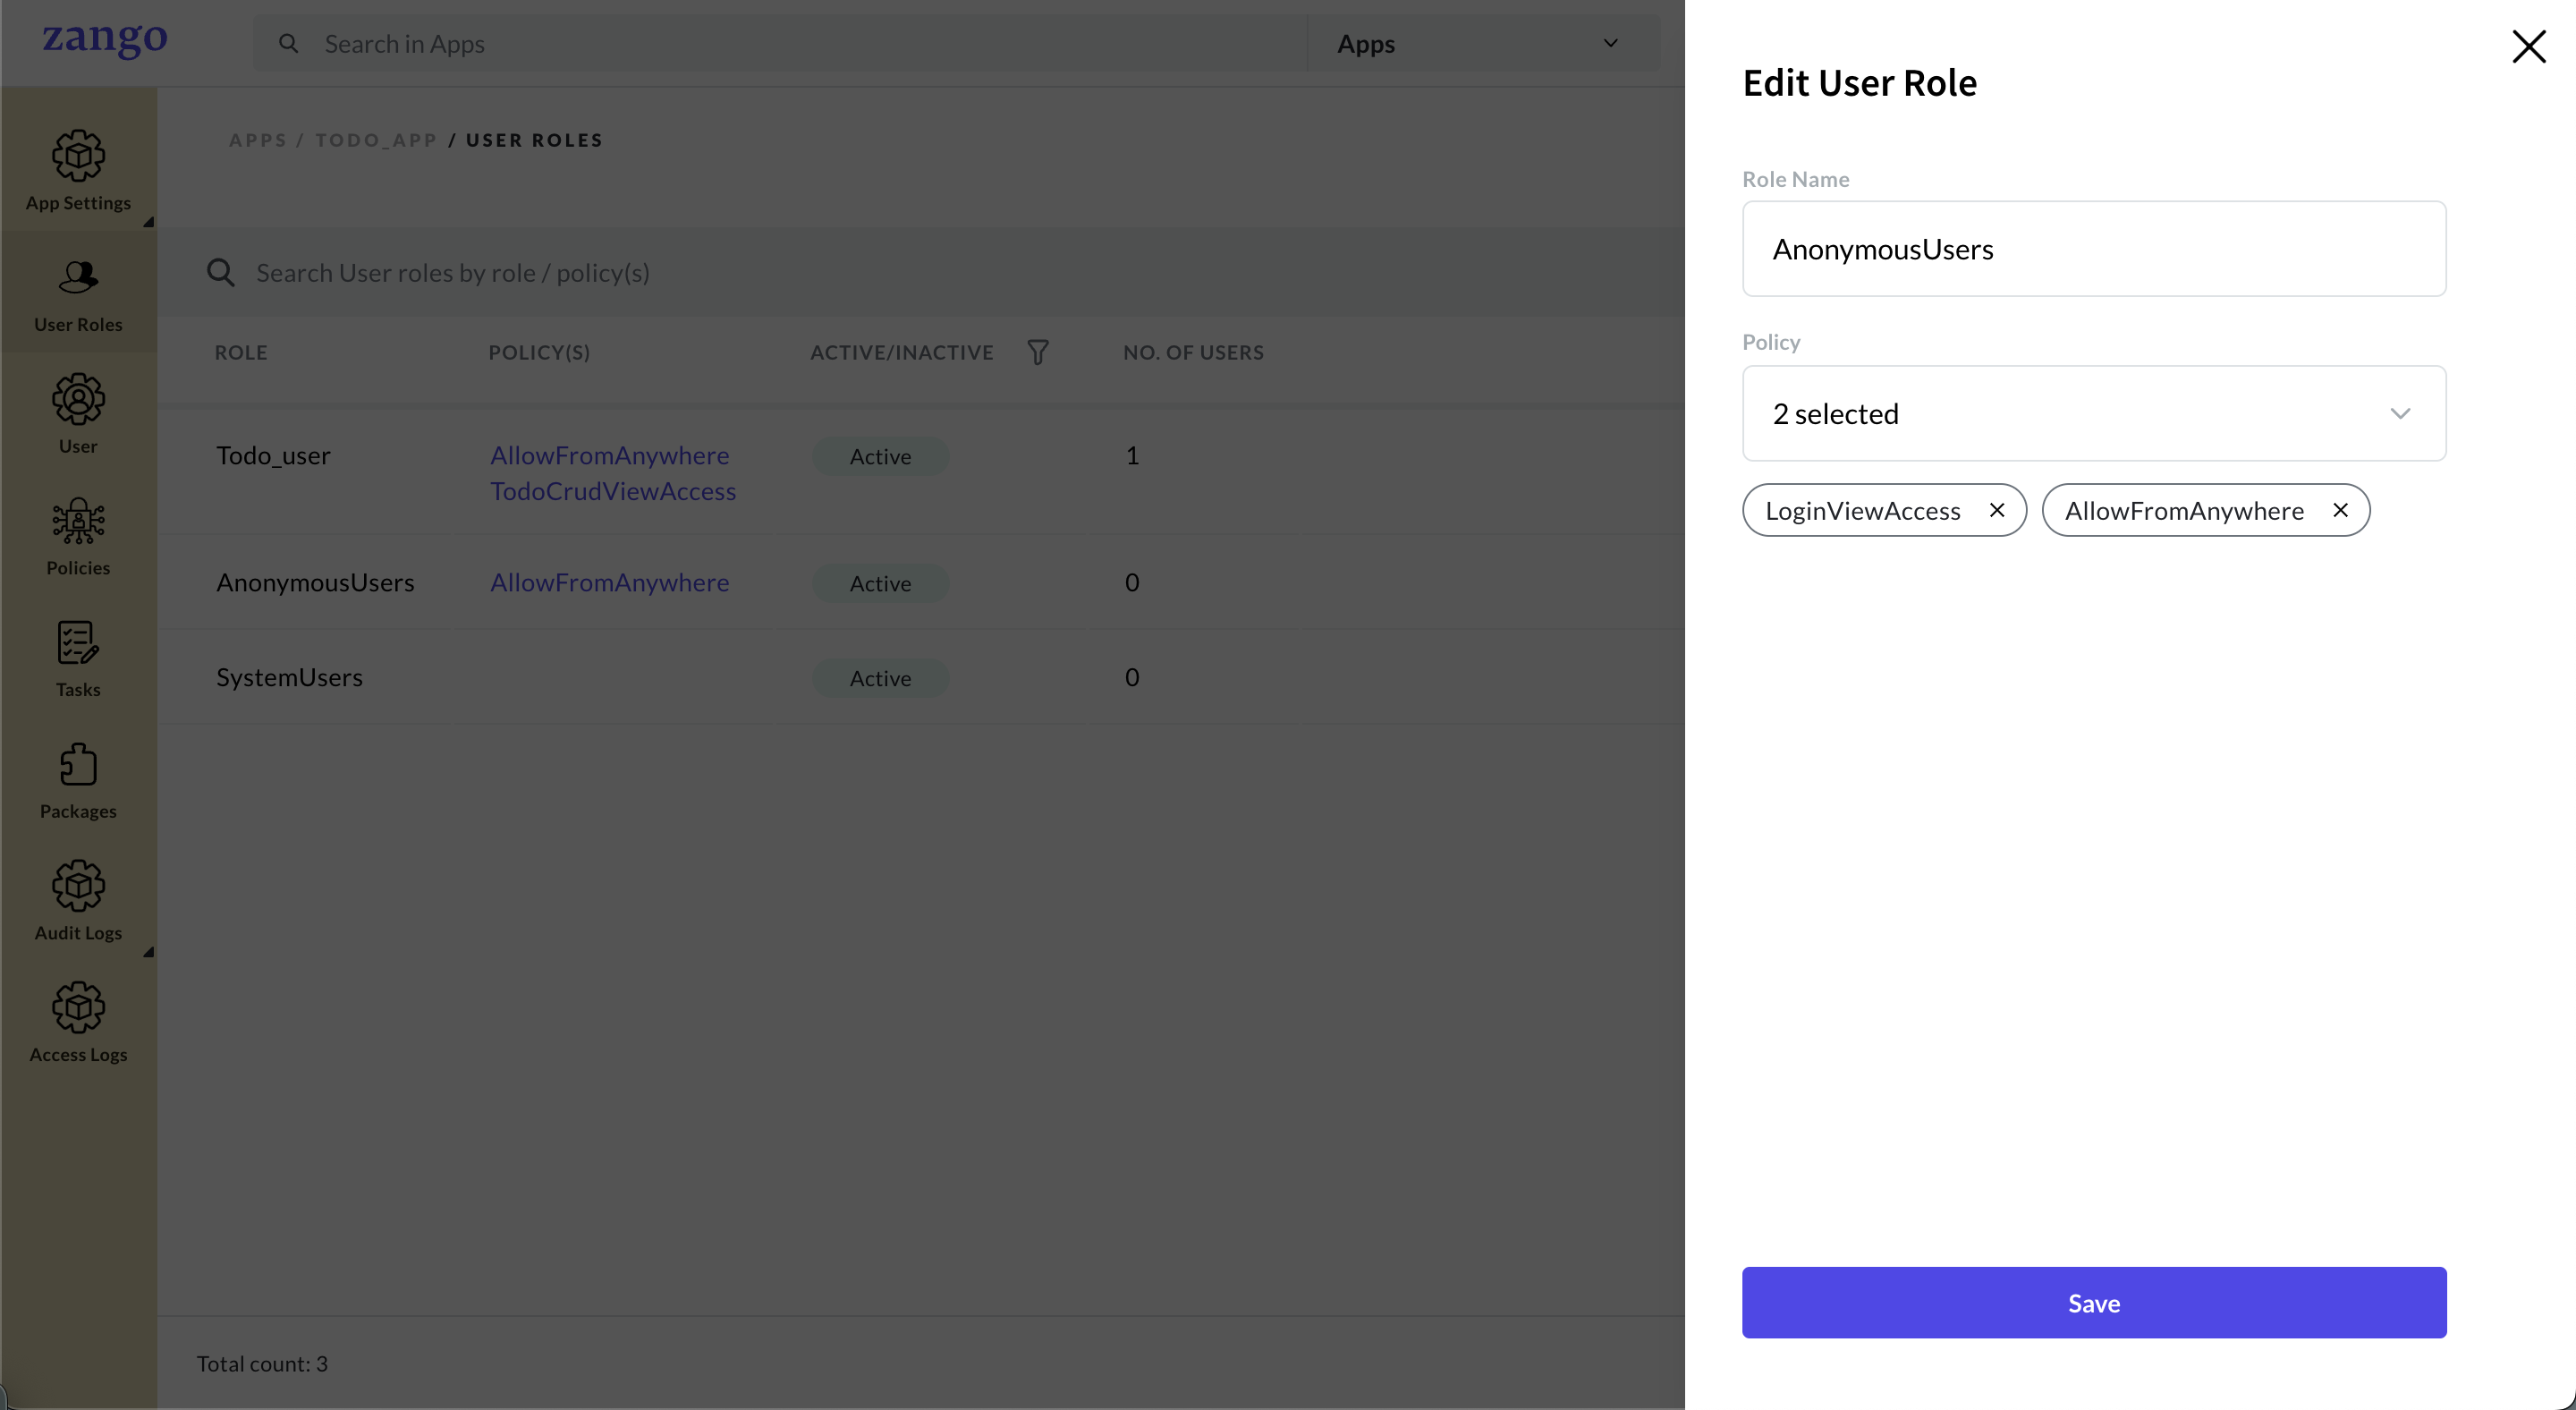
We also need to assign the LoginViewAcess to the AnonymousUsers role because at the time of login, we obviously don't have data of
a particular user so we will allow everyone to access the login page.
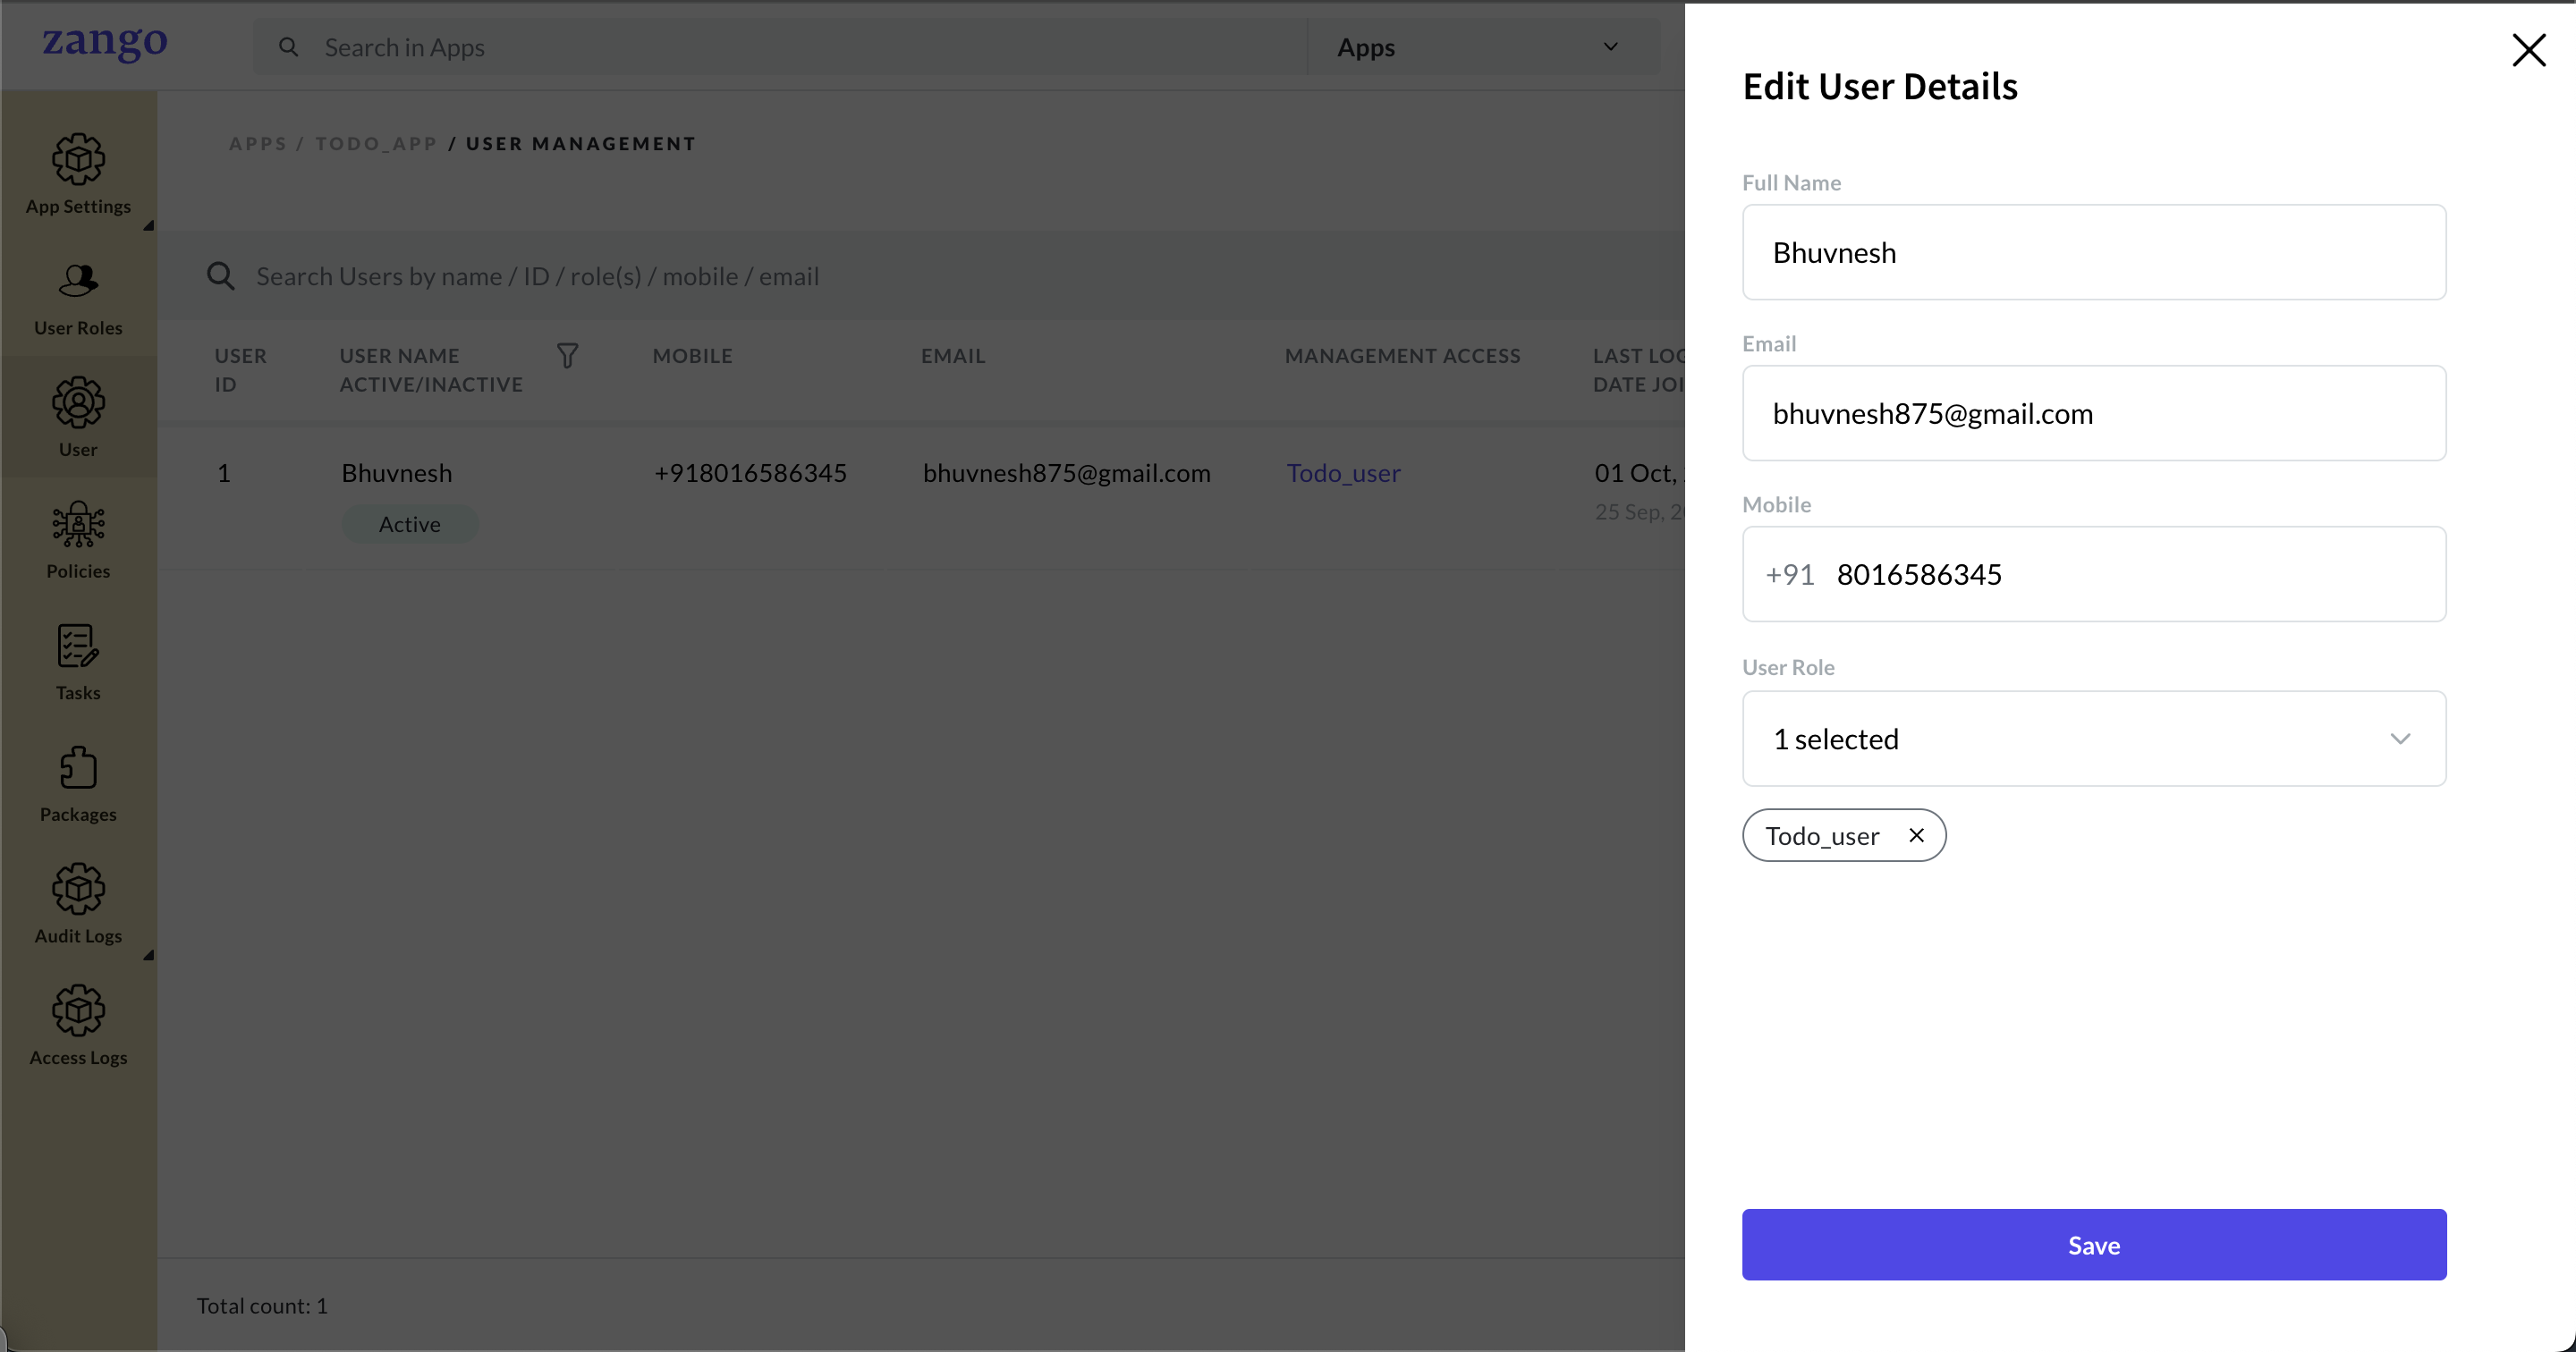
User management
This configuration allow us to create users which can have access to our project and we can assign them different user roles, we created in previous steps to define their permissions. You can read more about user management here.
For our todo app, we'll create one single user and assign it Todo_user role, so that it has access to our todo app from
anywhere.
Frames
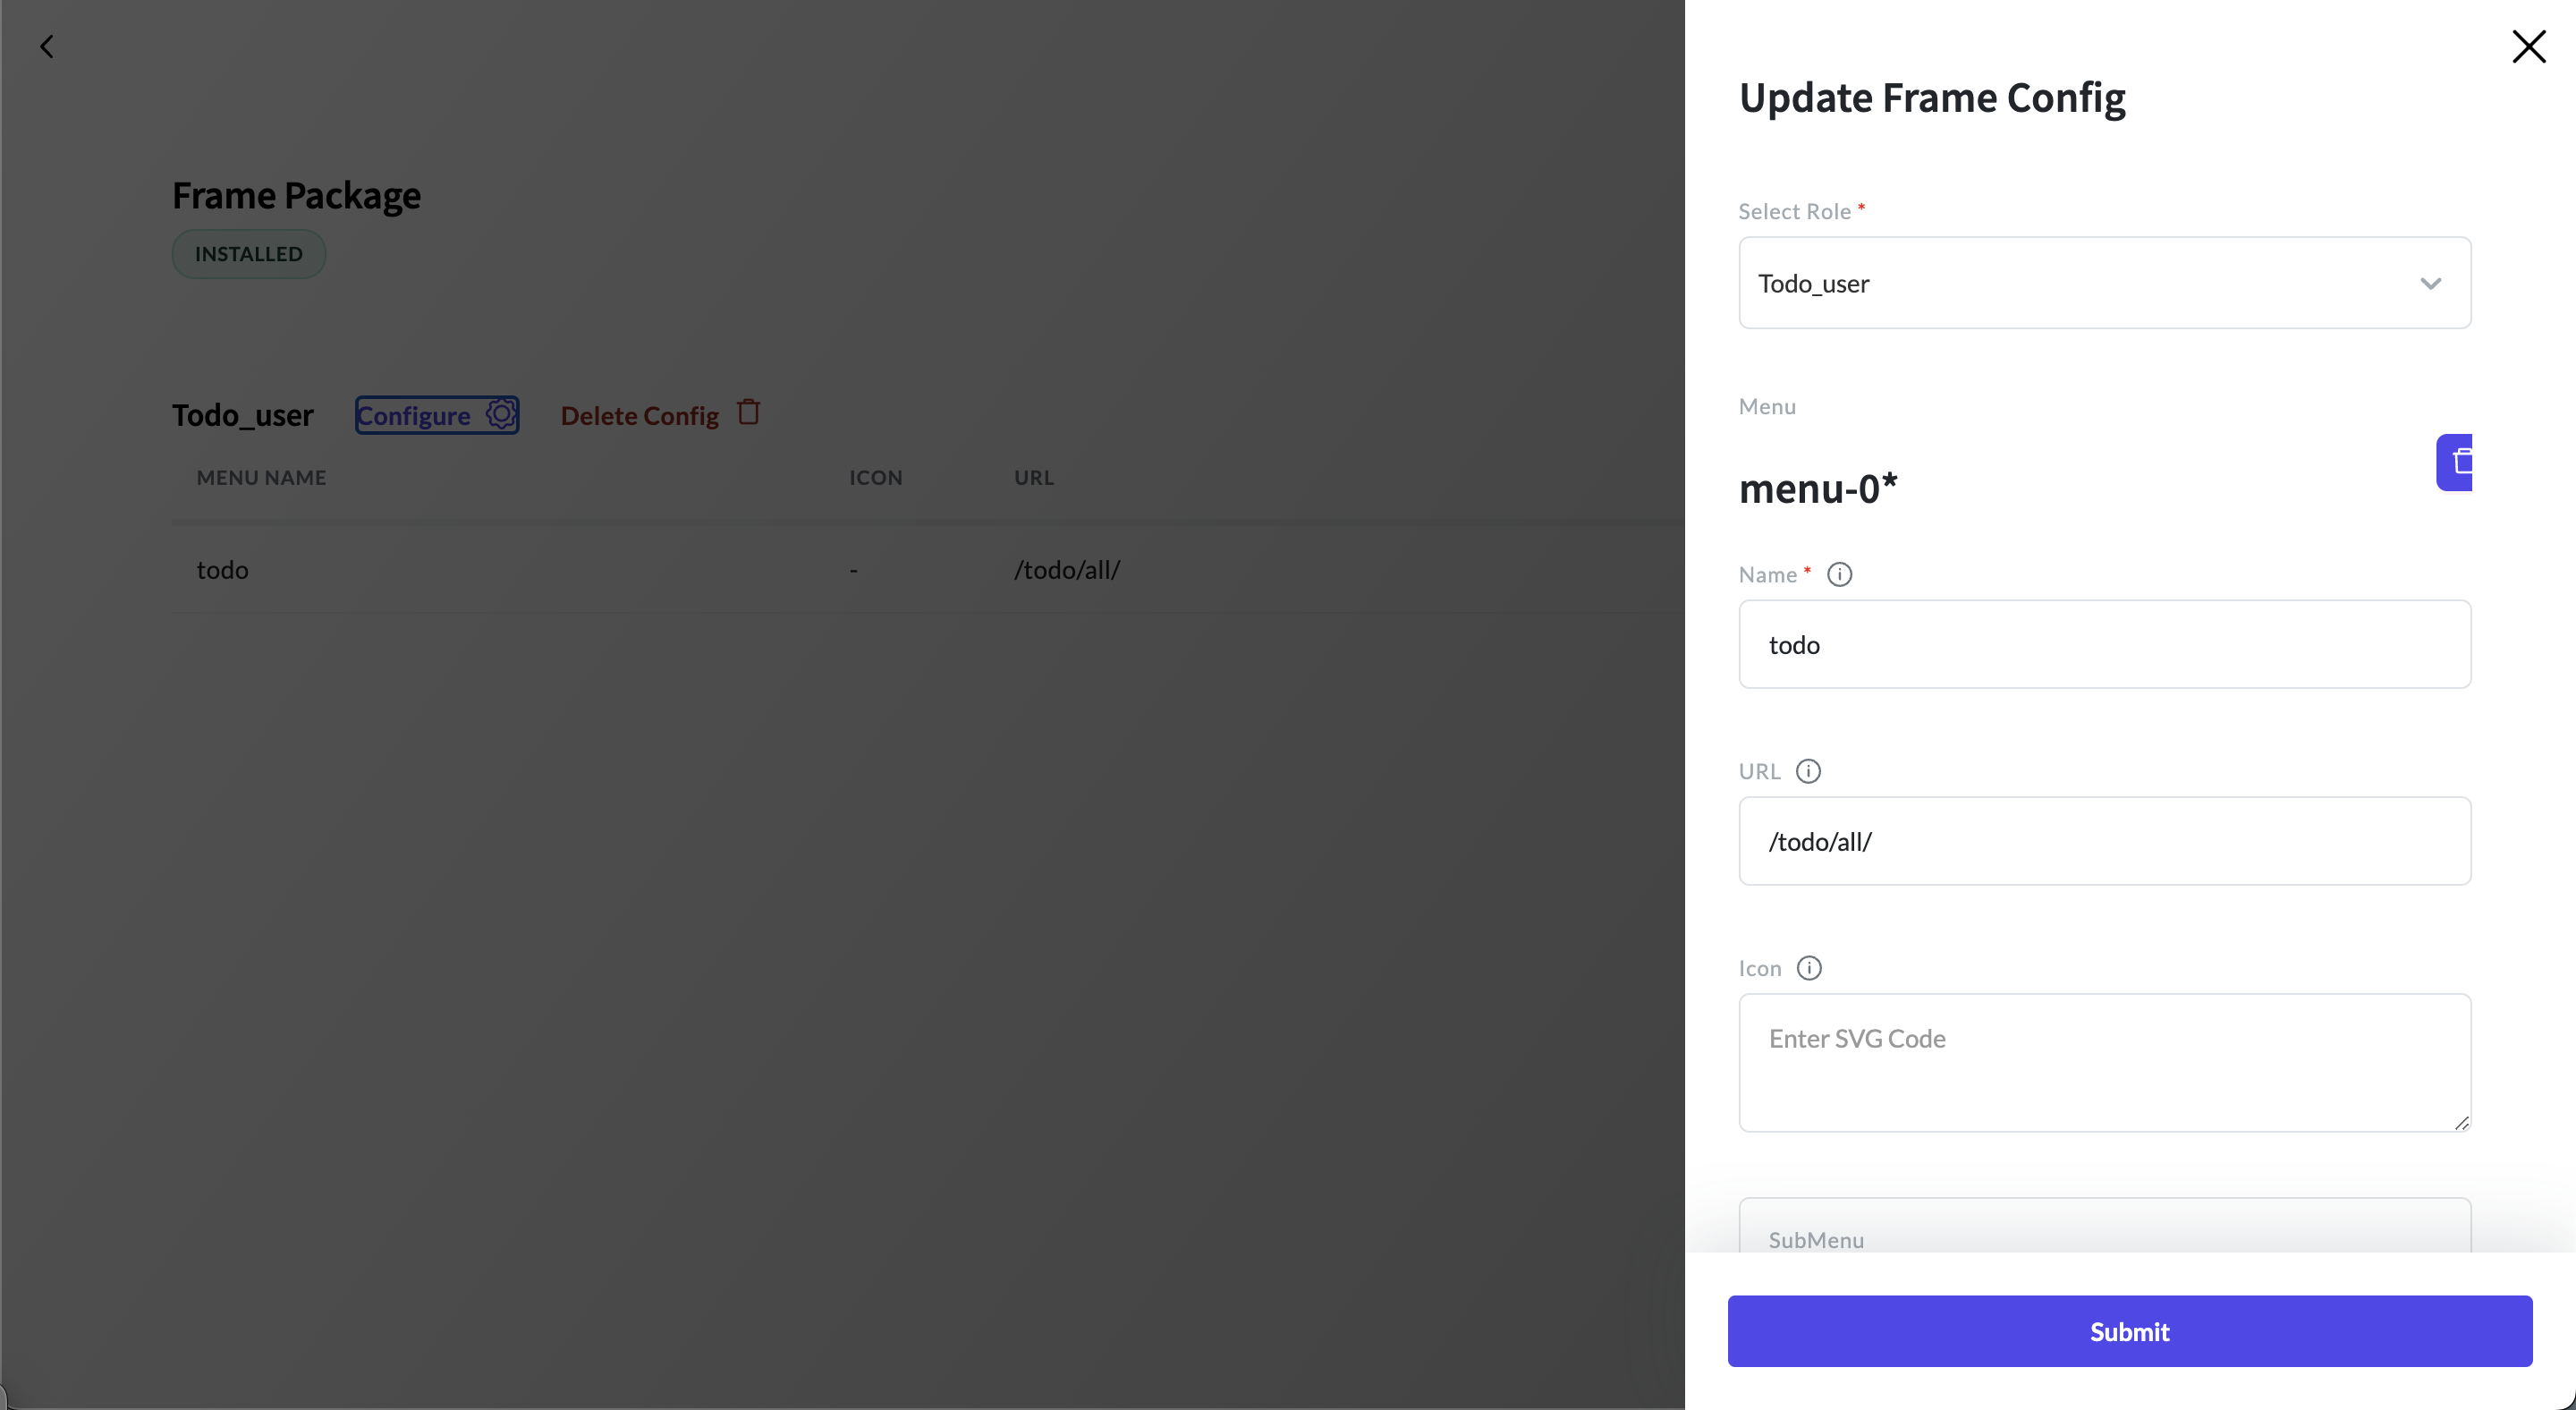
Next, we will specify the urls which should be linked to a particular user role. This functionality is
provided by the frames package.
In our todo app, we will allow our Todo_user role to access the /todo/all url.
Login
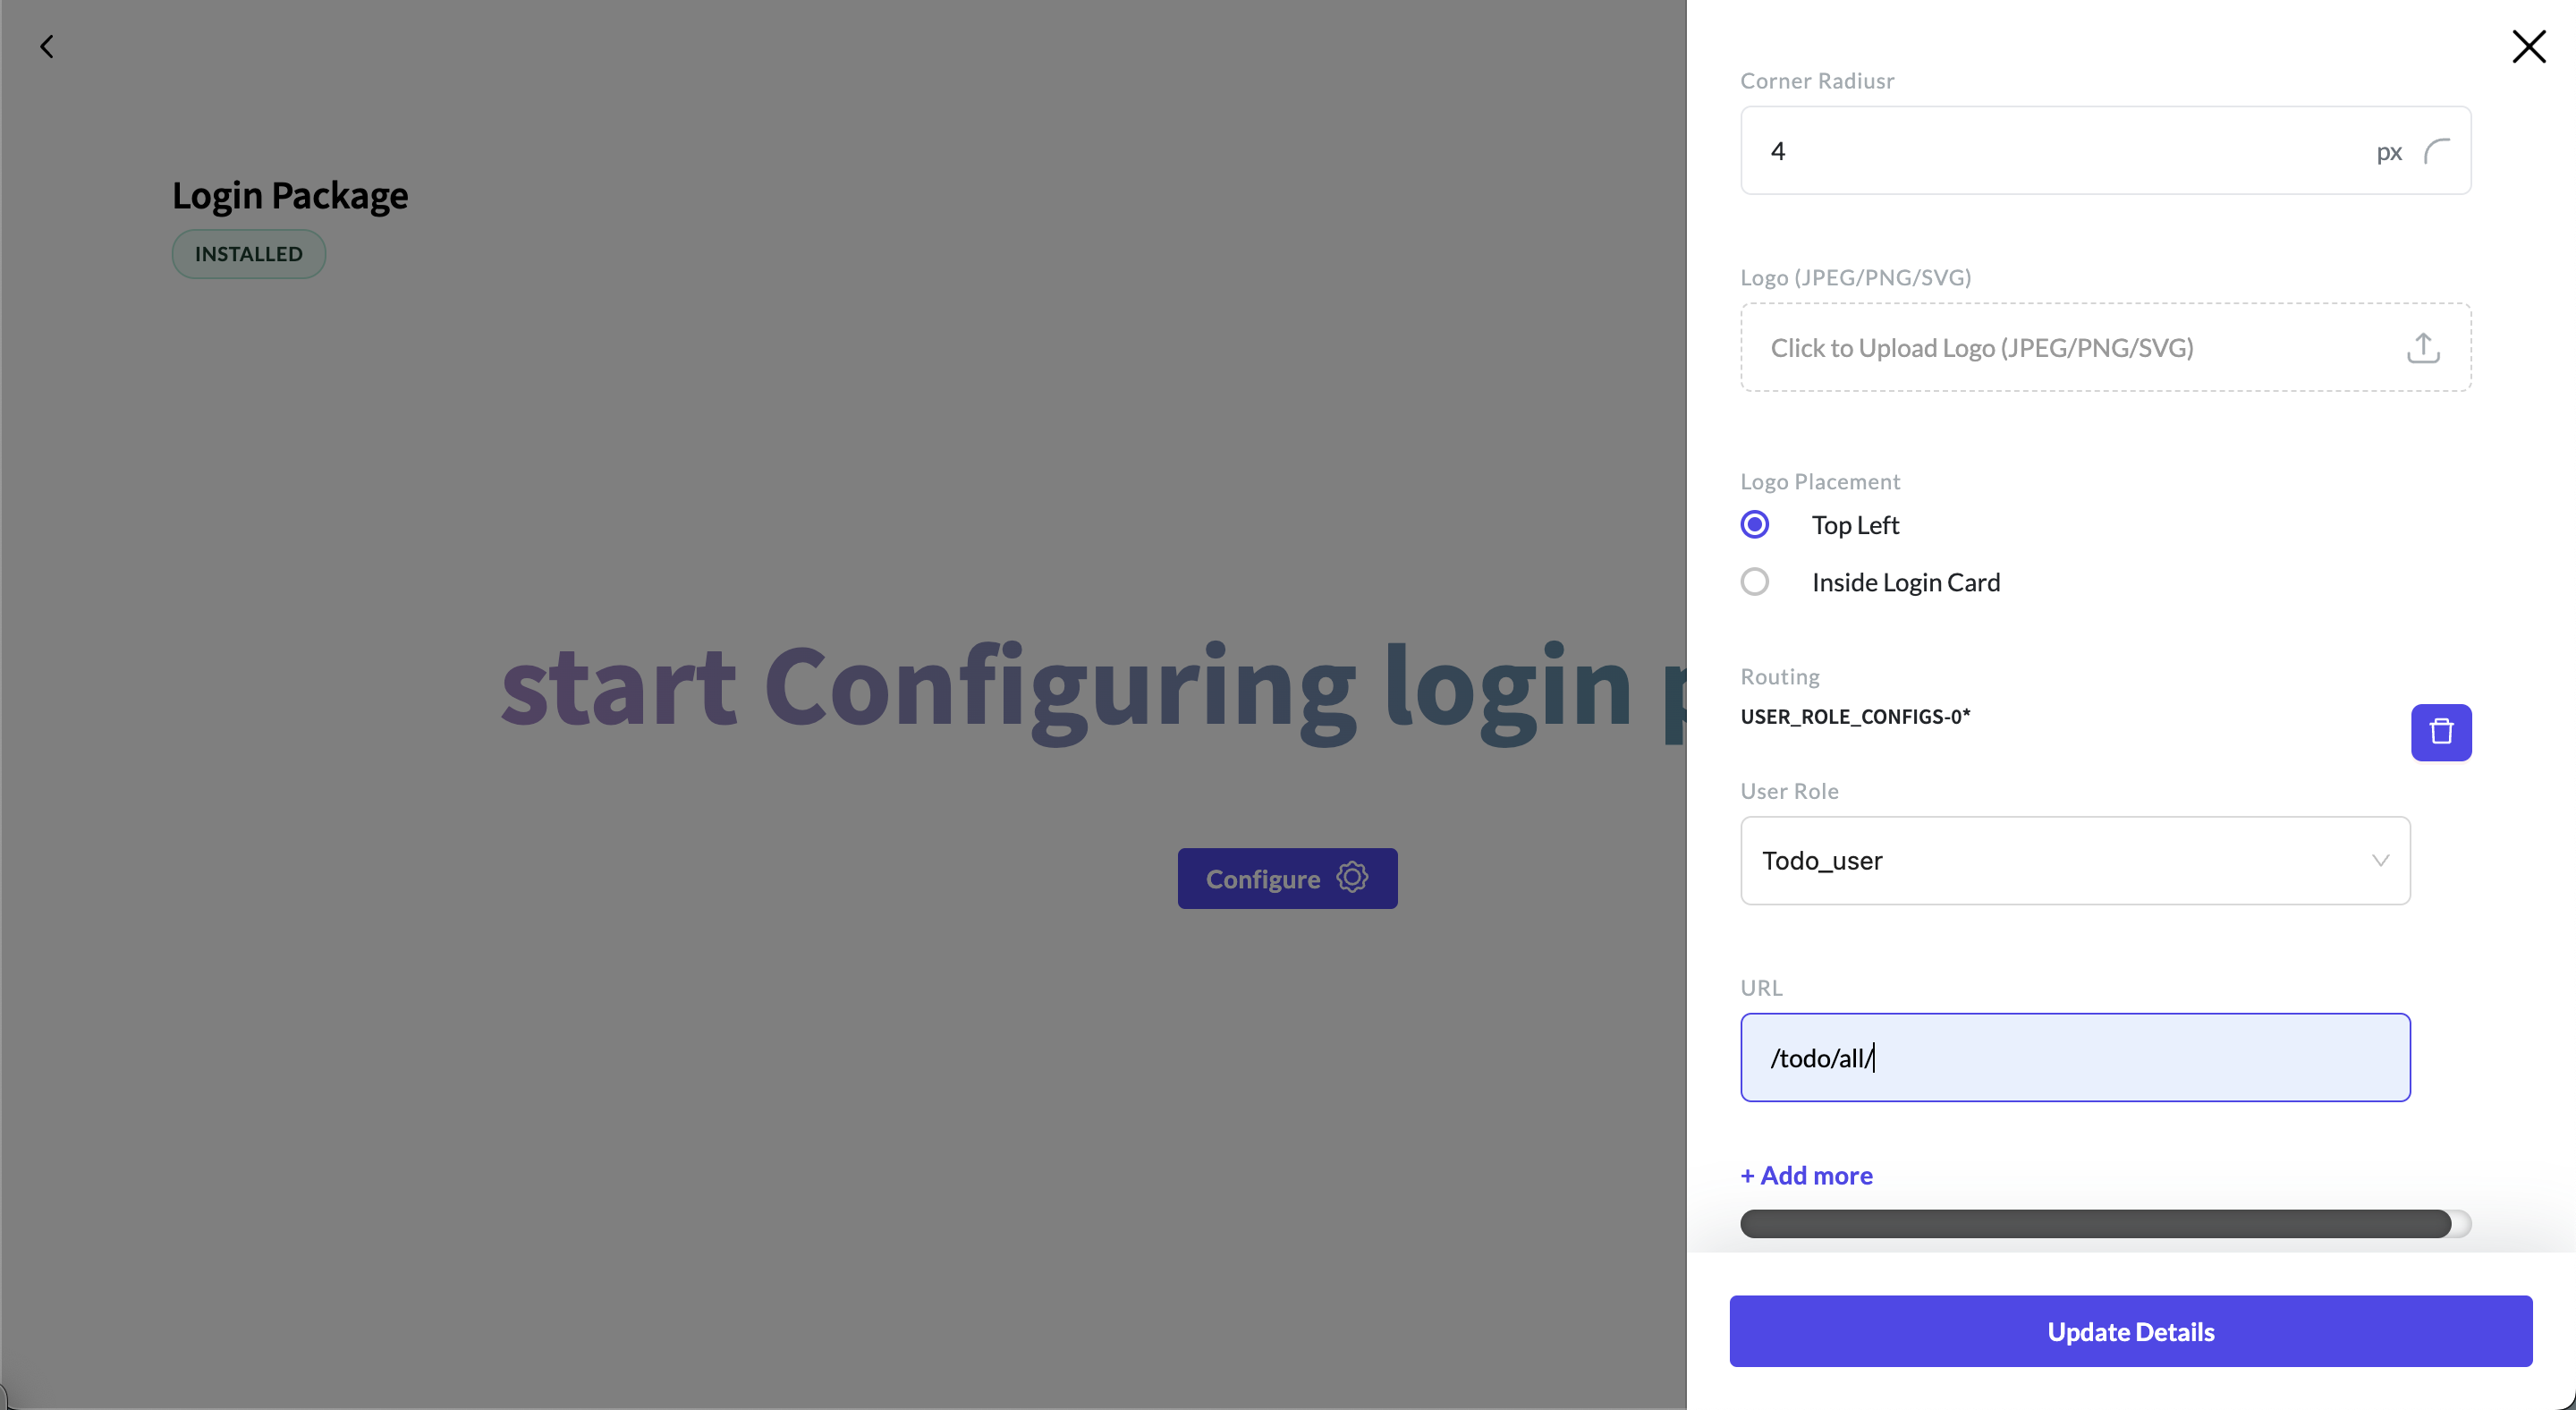
In the last step, we have to configure the login package to redirect us our todo app url
after the user is logged in. When you click on the configure button, a sidebar will open, scroll down to the bottom, under routing
click add more, select Todo_user in user role and set url as /todo/all and save it. Thats it!
Now when you will login with your user having Todo_user role, it will redirect that user to /todo/all url.
Let's try our todo app!
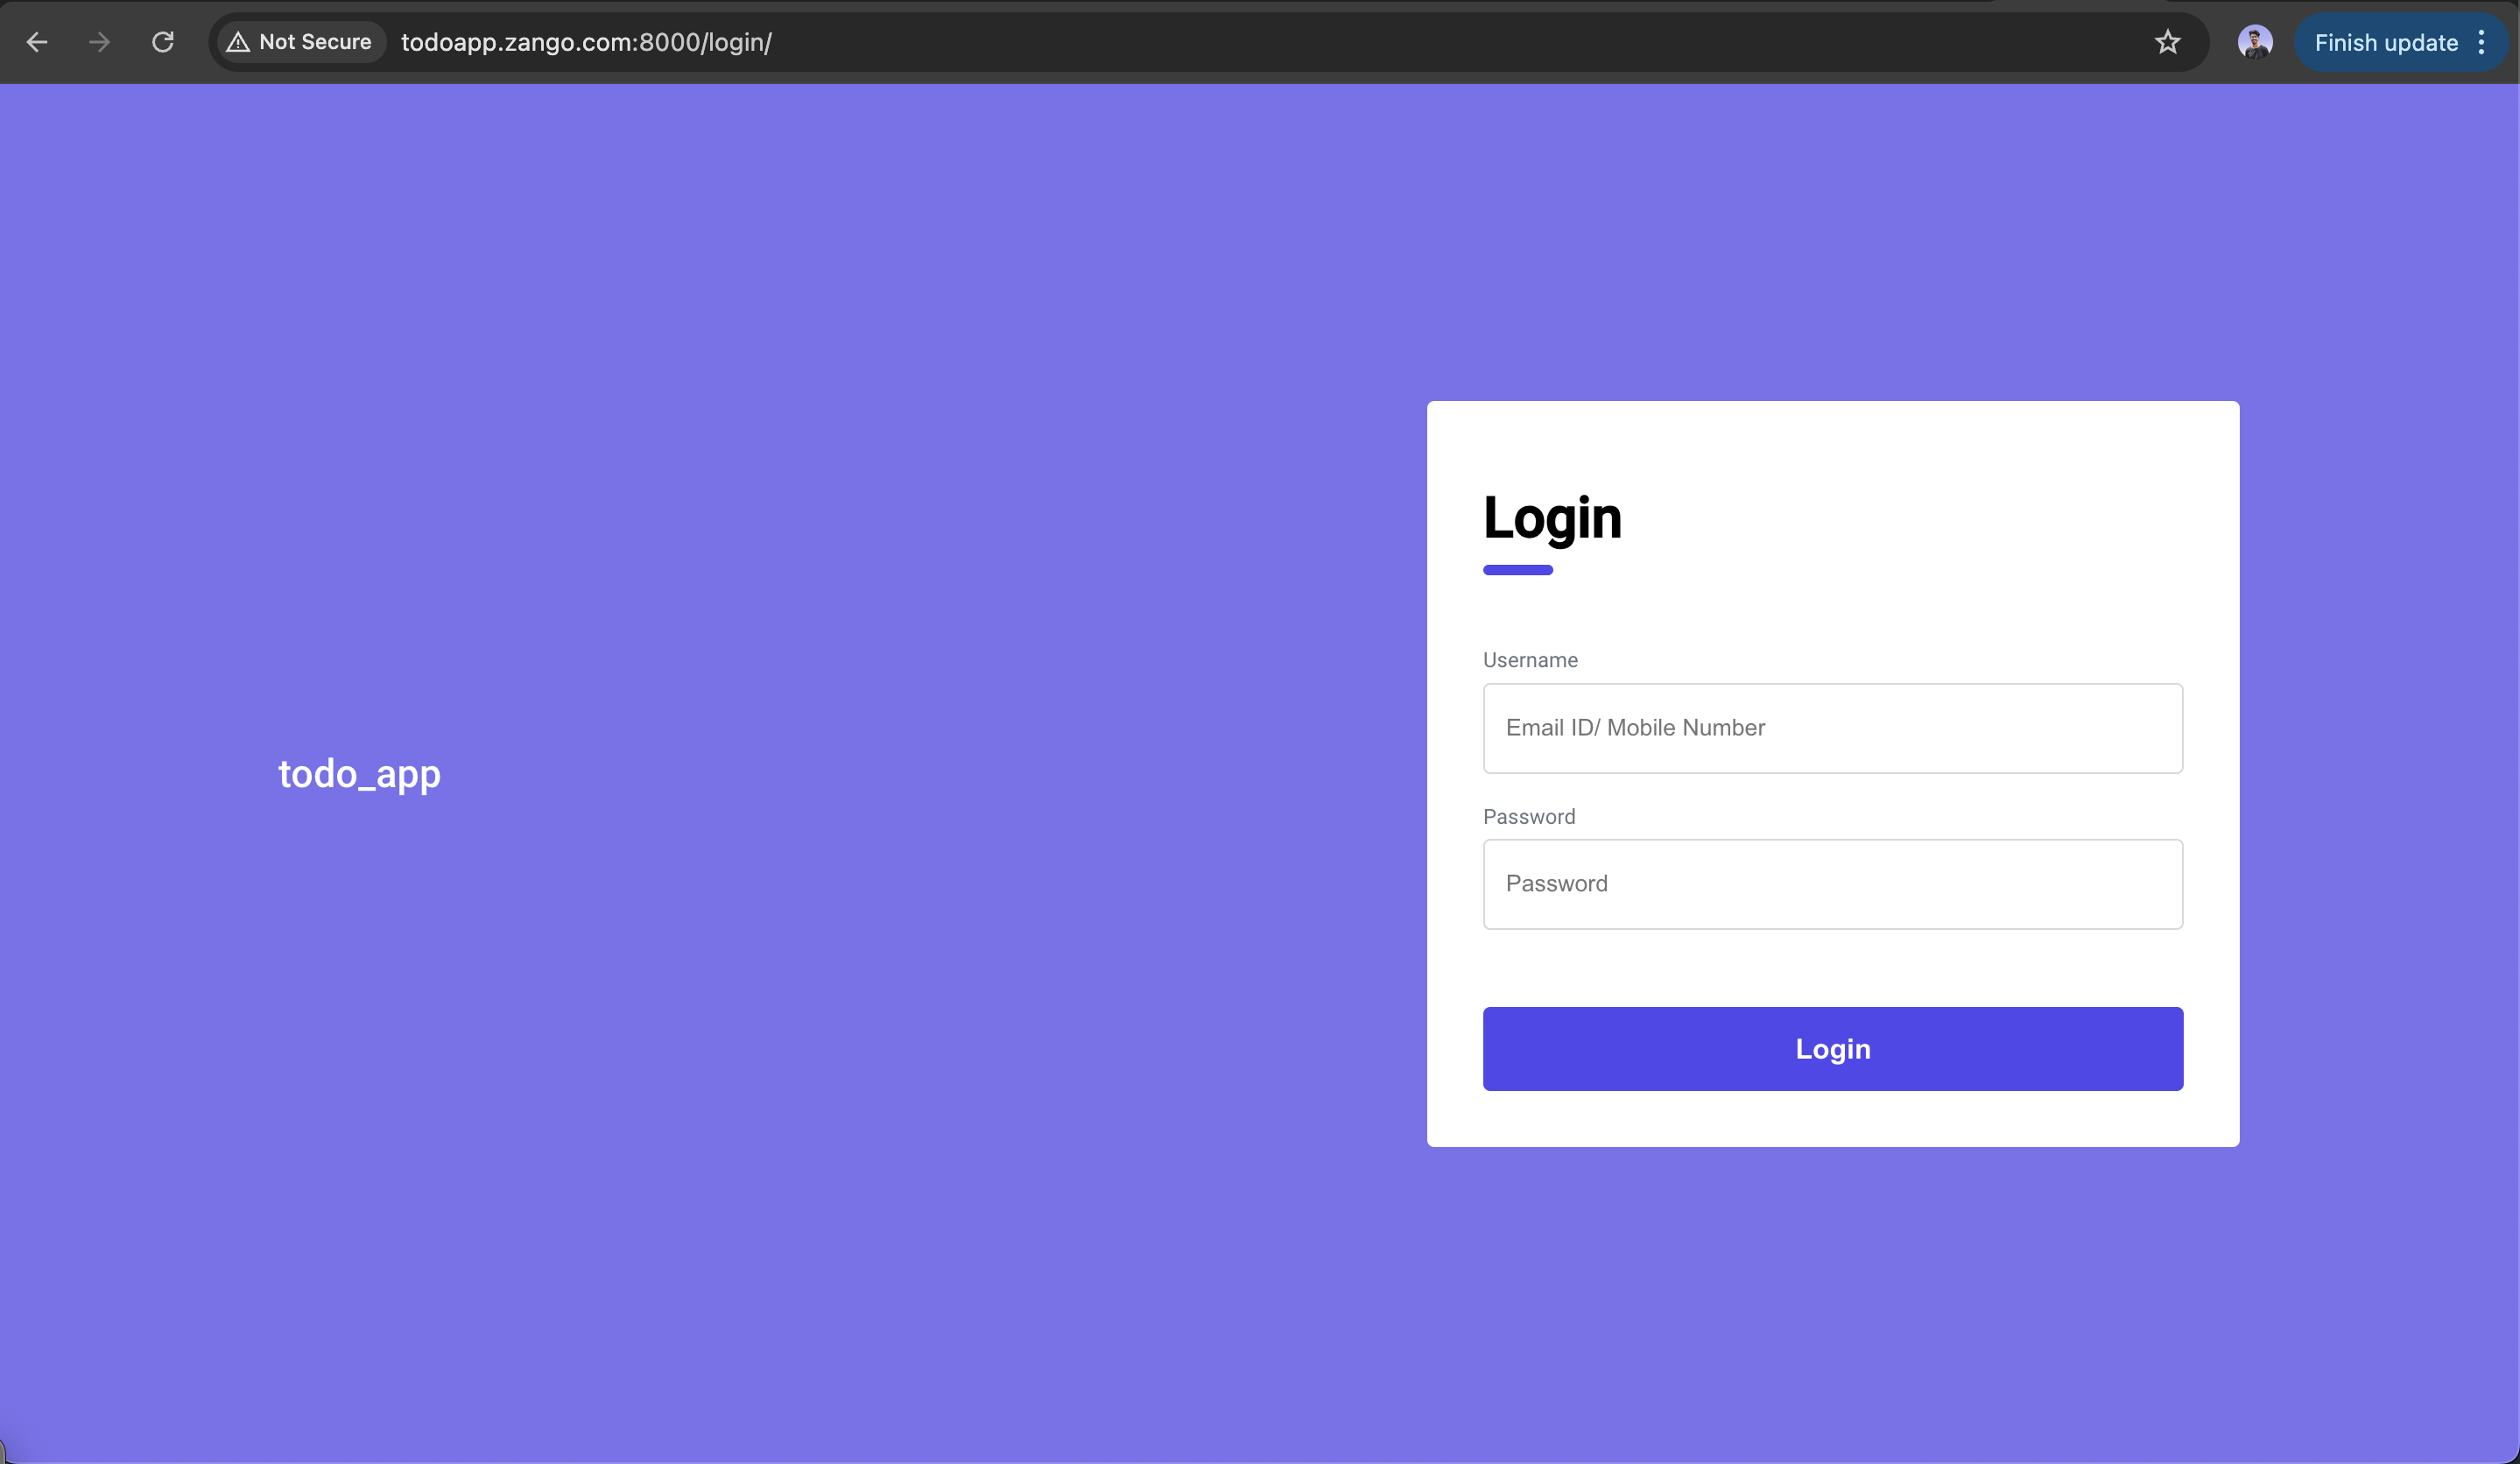
Now you should be able to access our todo app at http://todoapp.zango.com:8000/login/ domain. It will show a login screen and
you will be able to login to your todo app using the credentials you created in the above user management configuration.
After you have successfully logged in, you'll see an empty table because you don't have todo item yet. Go ahead and create some
todo items usign the new todo item button at top right.
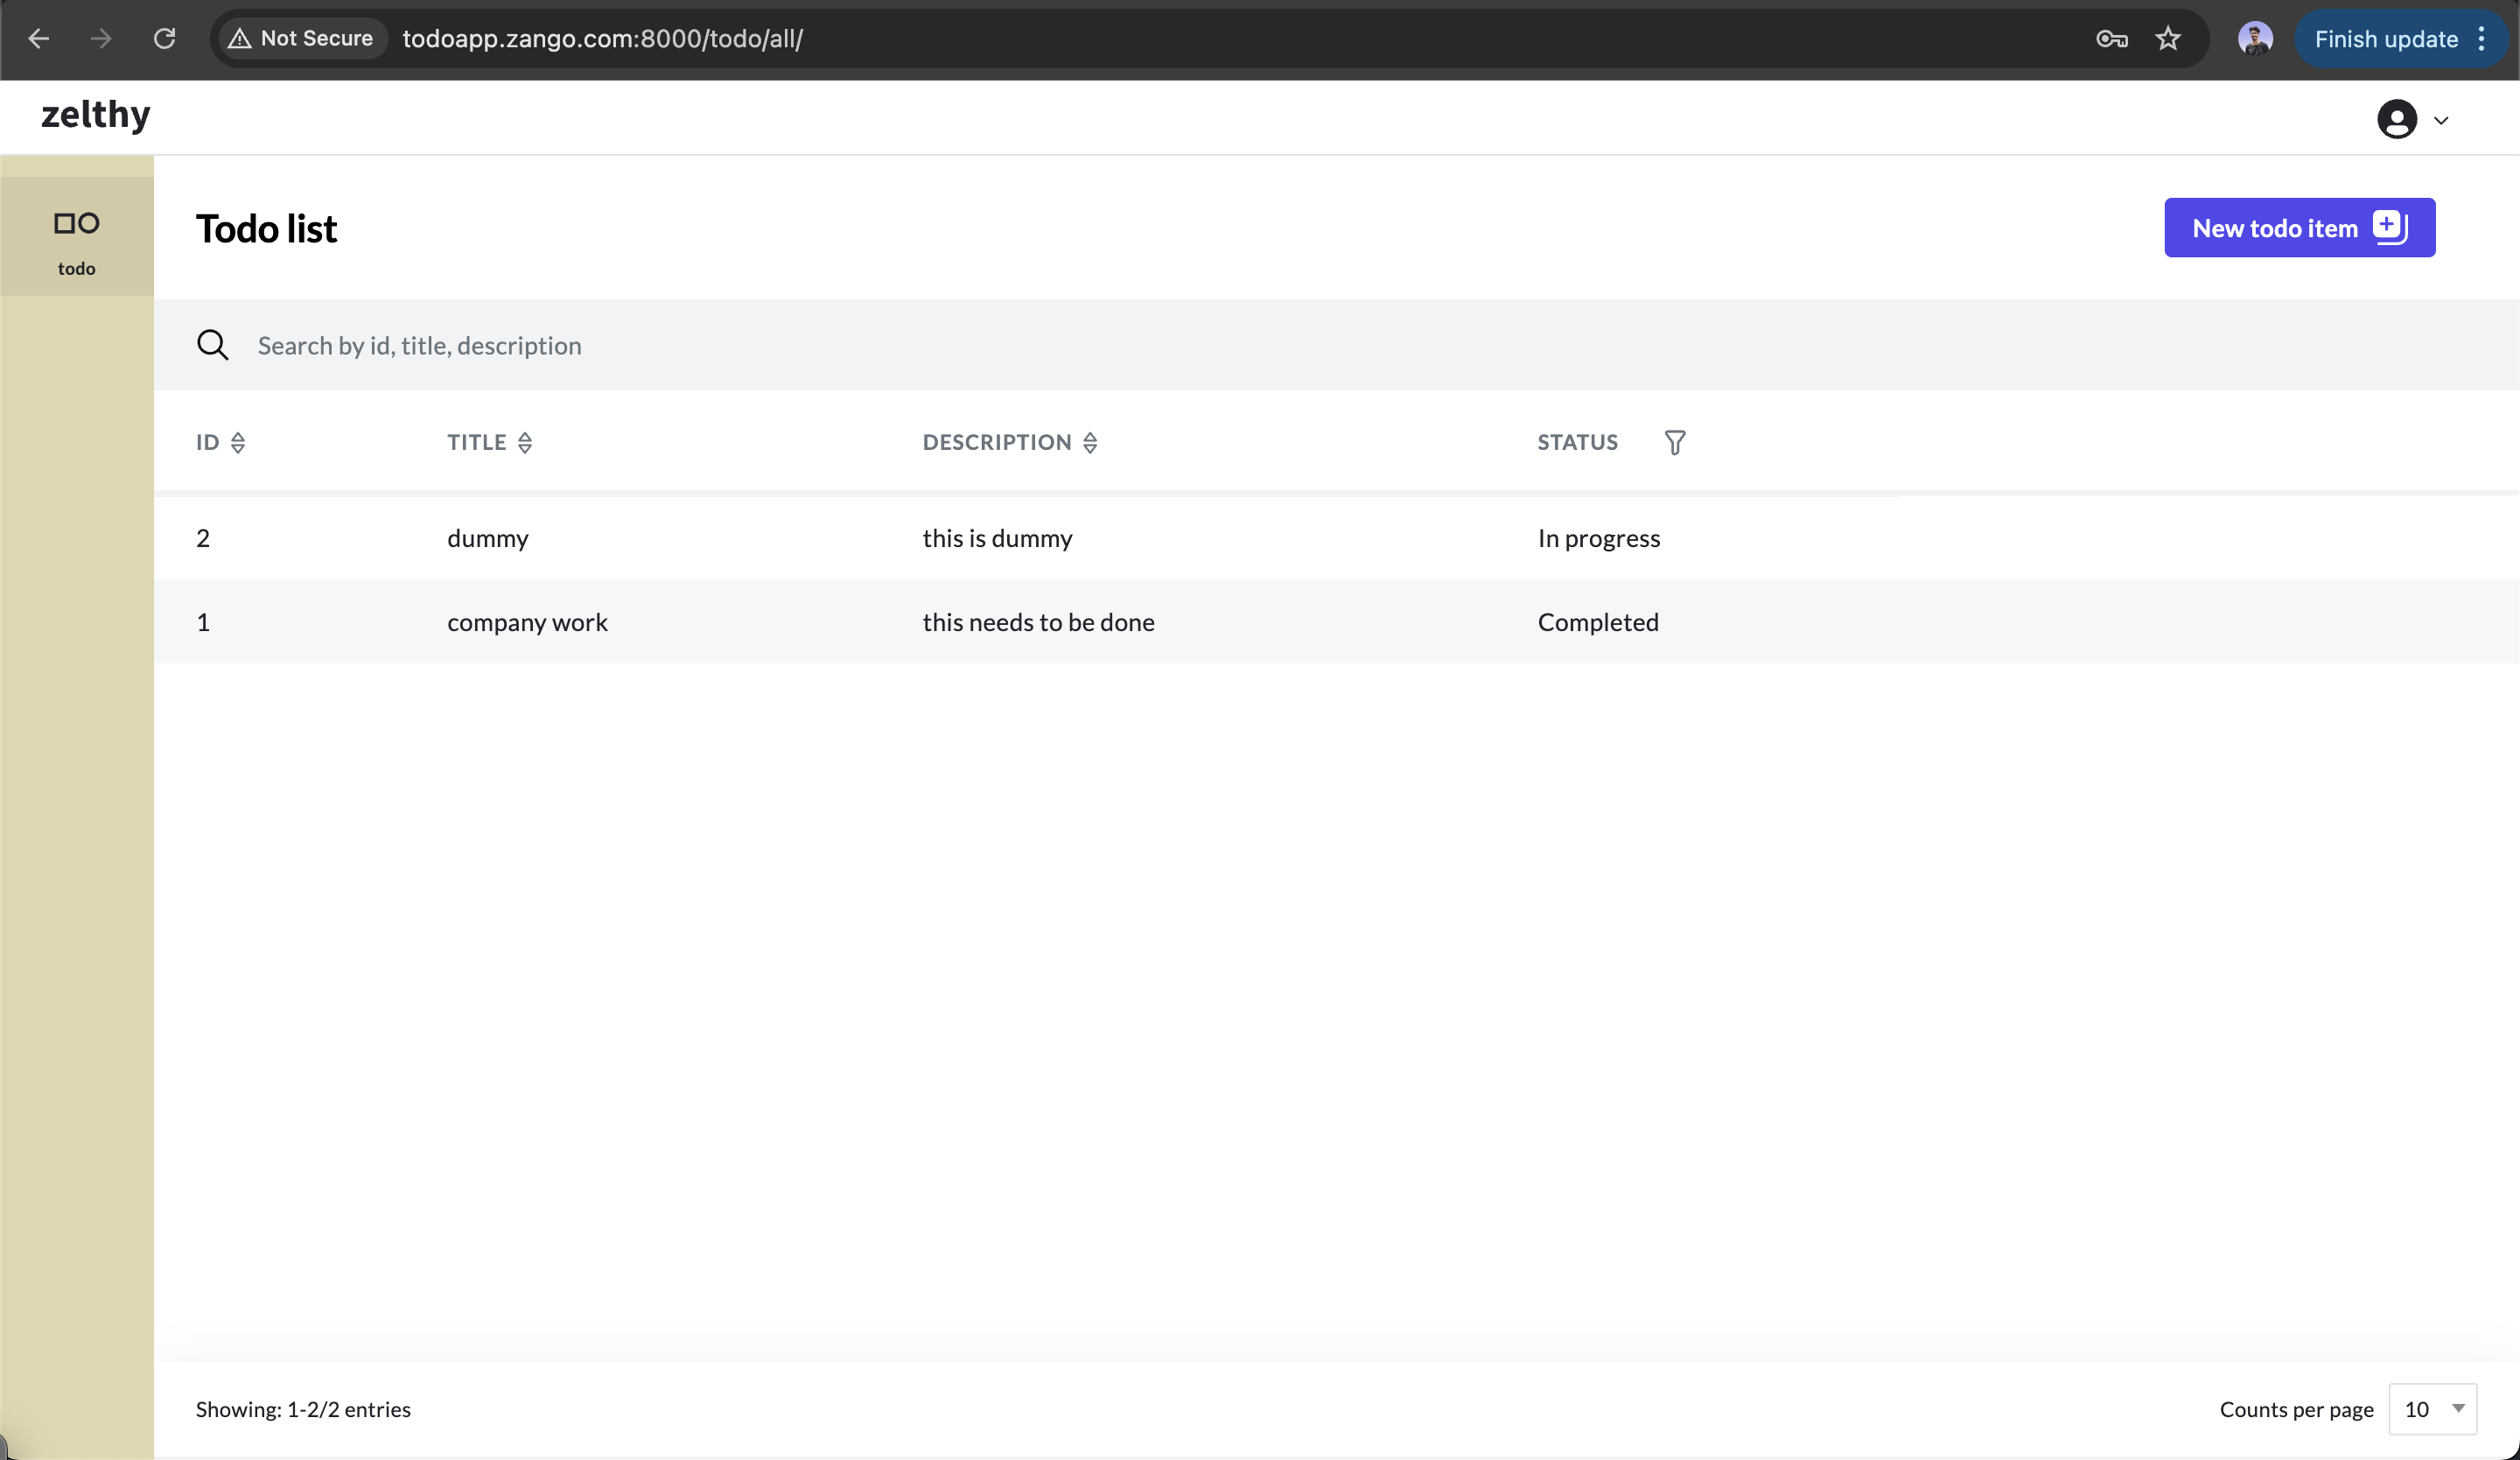
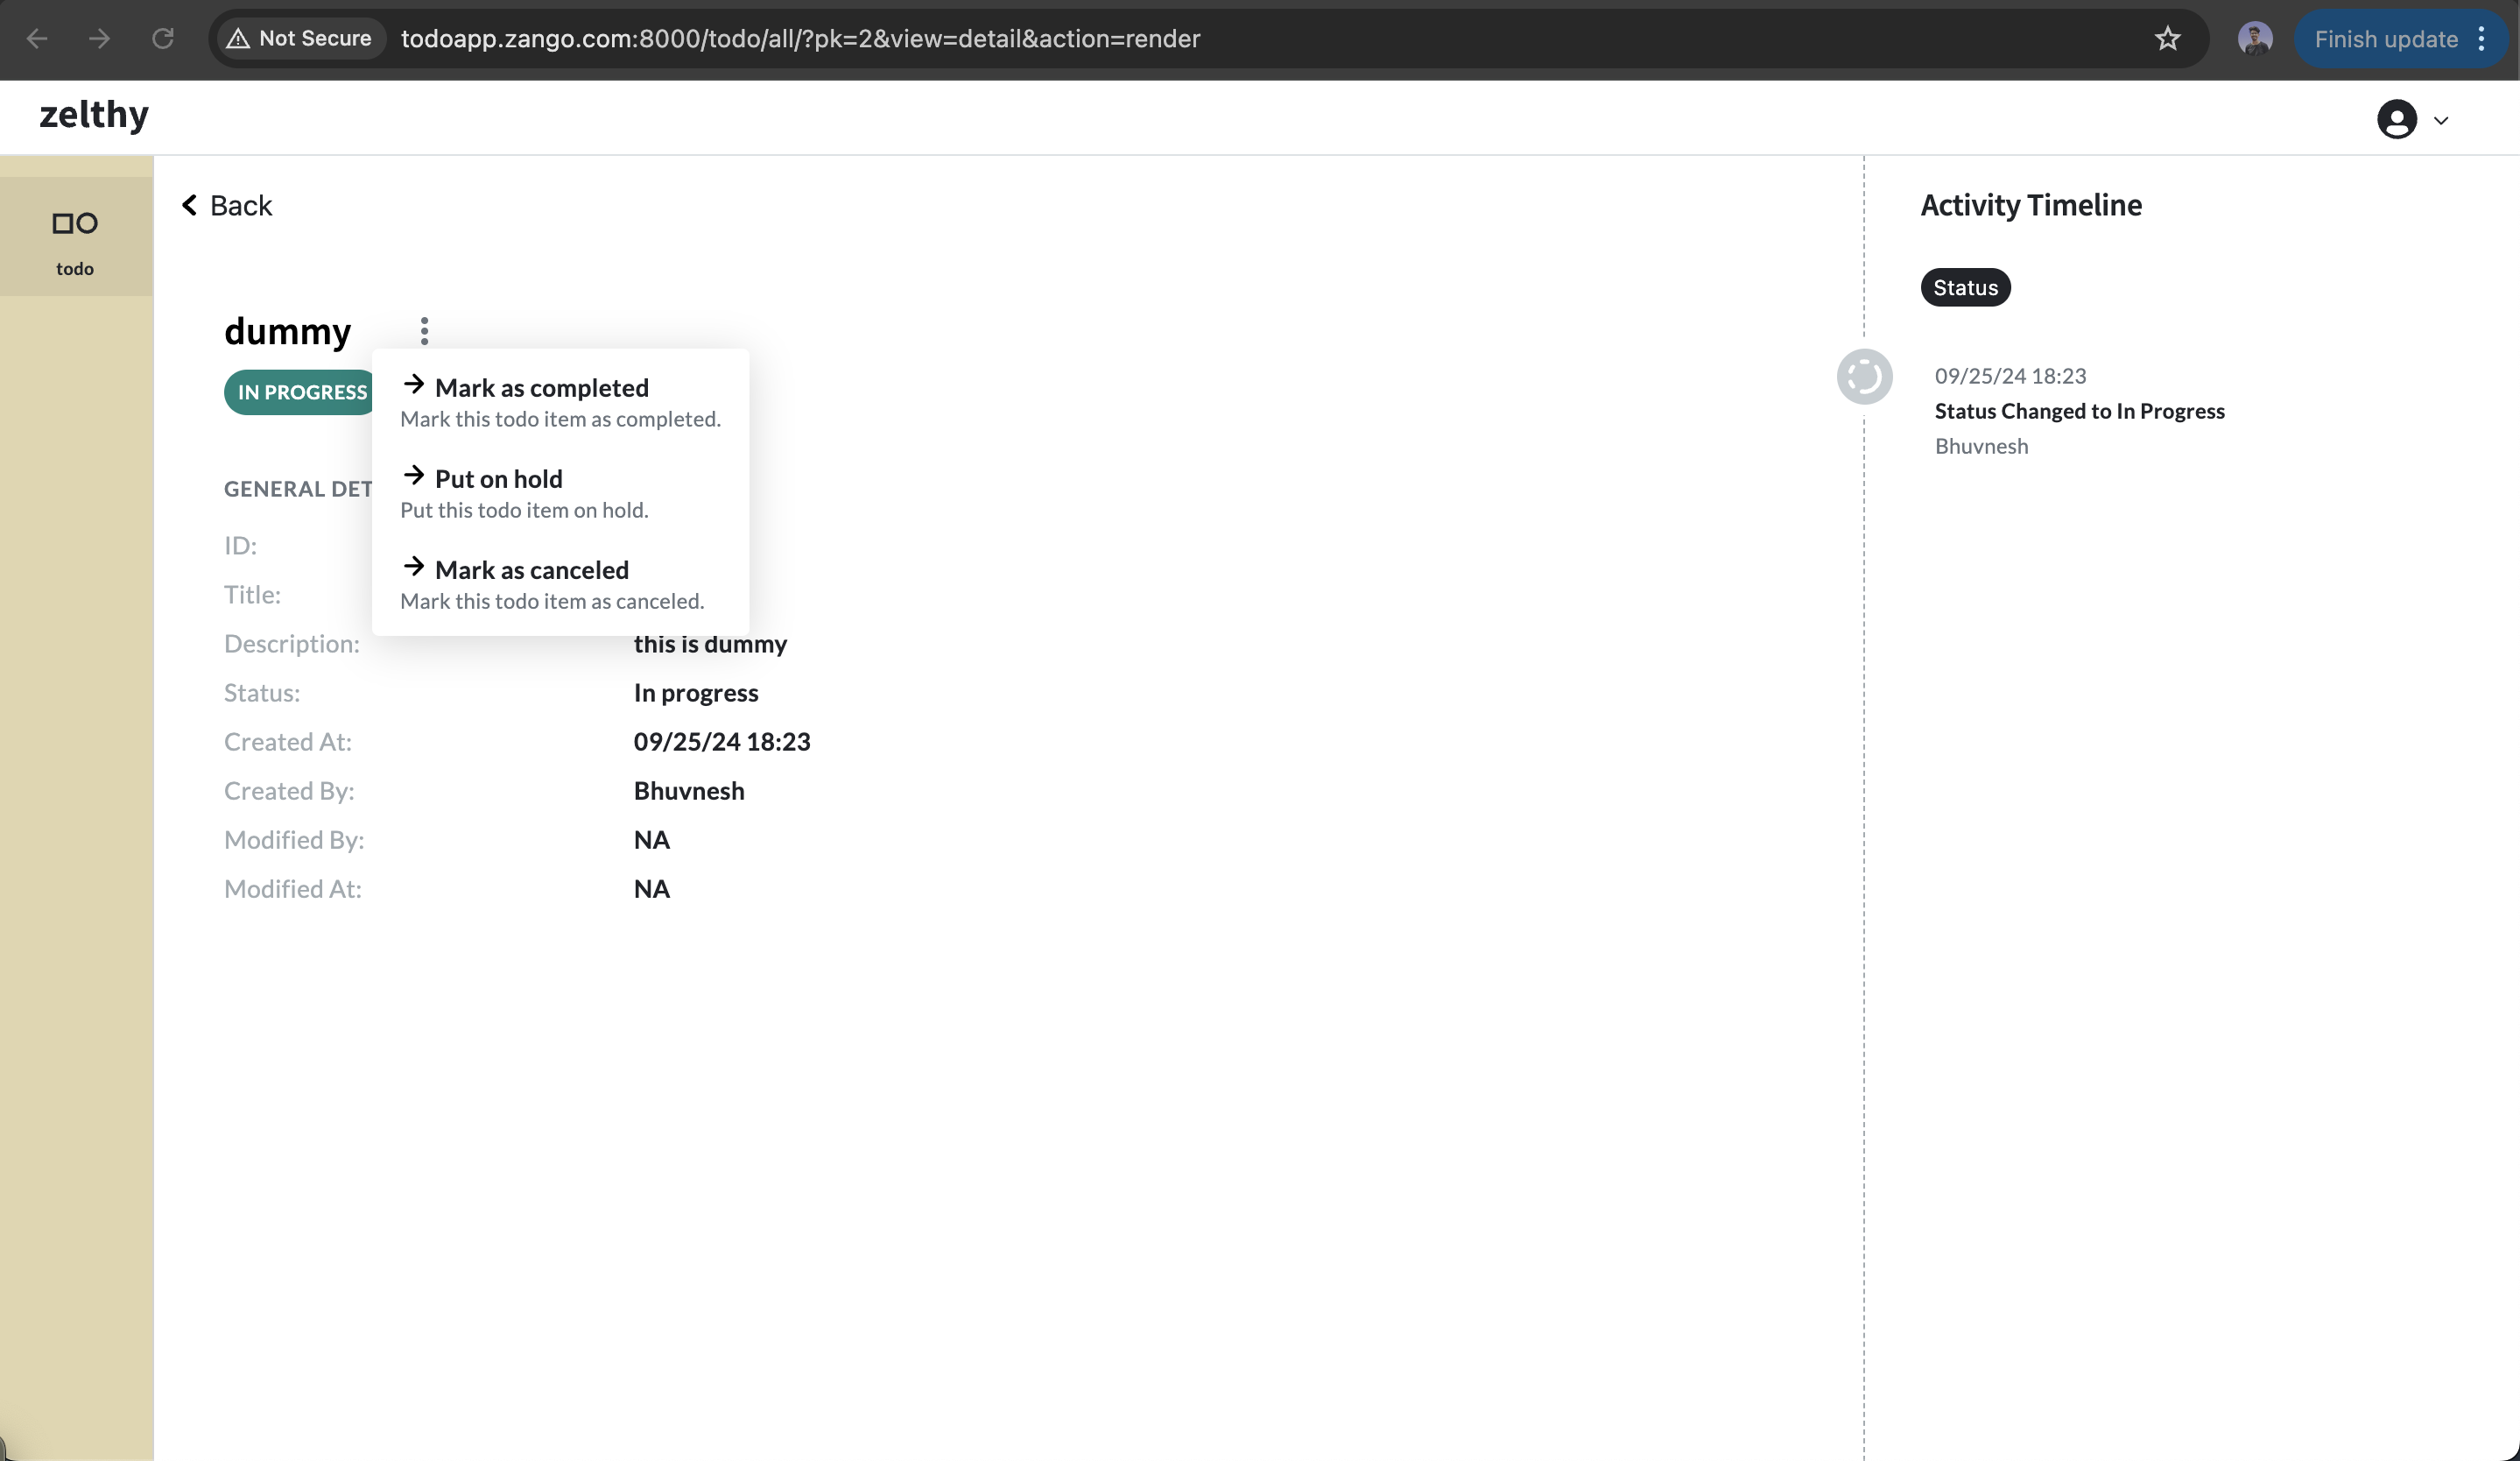
When you hover on a todo item, you'll be redirected to a page containing more details about the todo item. On that page you'll
notice three dots in front of title. By clicking on those dots, you'll get an option to change the status of the todo item
along with an activity timeline on the right.
Congratulations for making it to this far! You have successfully created a todo app using zango!